LMS
Learning Management System
15 Nov 2015

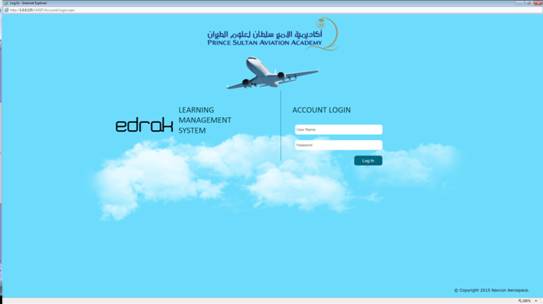
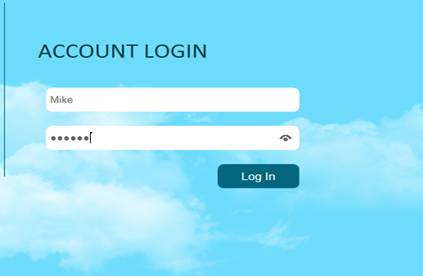
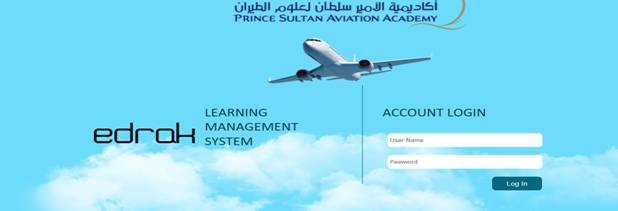
Login Page
This is the page where the user can access the LMS. Remember that the user has to register before attempting to log in. (See User Registration).
Login
If the login is successfully completed, Non-Trainees will be directed to the Management Page and Trainees will be directed to the Trainee Page. (The Trainee Page will be explained later.)
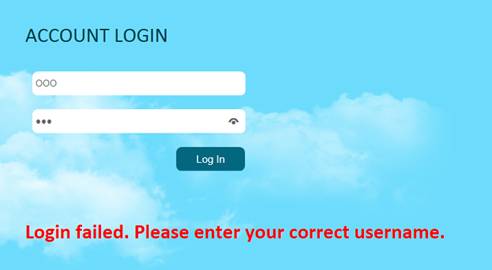
Invalid password or username
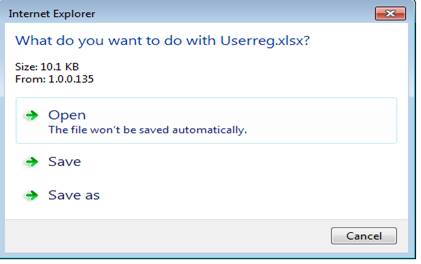
If the user is not registered, the user will see a text like this:
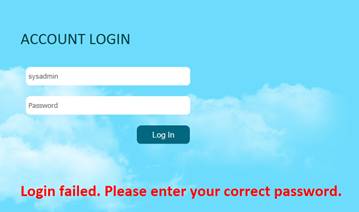
If the user enters an invalid password, the user will see a text like this:
Entering an invalid password eight times will lock the user account.
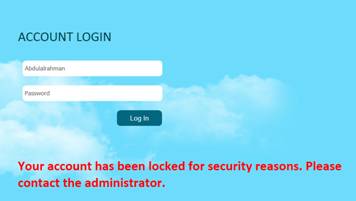
On the Manage Users Page, there is Unlock Account function available, which allows the user to login and use the system. (See Manage User Page)
Newly-registered users have to log in using the username and password that have been created by the provider.
After entering the username and password, the user must click on the Log In button.
The user will be directed to this page:
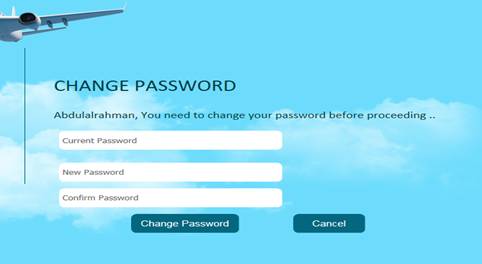
The user must enter the old password, a new password, and then confirm the new password. The user must then click on the Change Password button.
Updating the password to a new password will display this page:
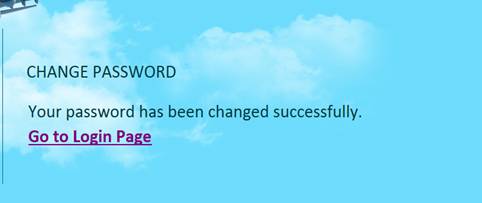
Now, the password has been changed successfully.
Clicking on the Go to Login Page linkwill direct the user to the login page, where the user can start using the system.
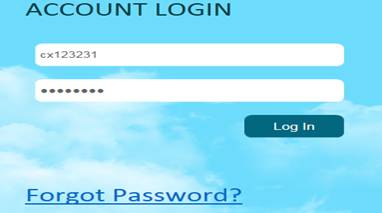
Forgot Password
If a trainee forgets their password, they may contact the system administrator in order to reset the password, the system administrator can reset the password using the Manage Userspage or User Registration page.
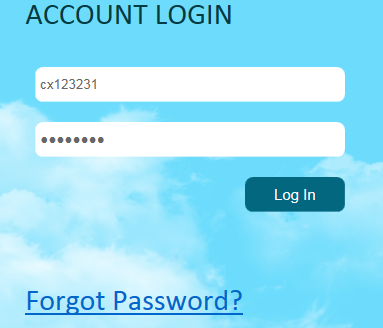
Alternatively, they may click on the Forgot Password? label to answer the security question.
![]()
1st Note: A security question should be created by the trainee using the my account page under security questions
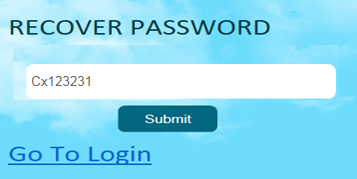
If the security question has been reset previously the trainee may click on the Forgot Password? label which will display this form, where the trainee enters the username.
The trainee may click on the Submit button to proceed to the security question.
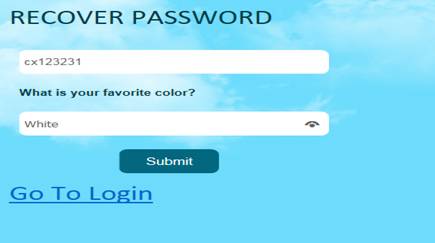
The security question will be shown as below.

Type in the answer, then click on the Submit button.
If the trainee’s answer is incorrect, this message will show:

If the answer is correct, this message will show.
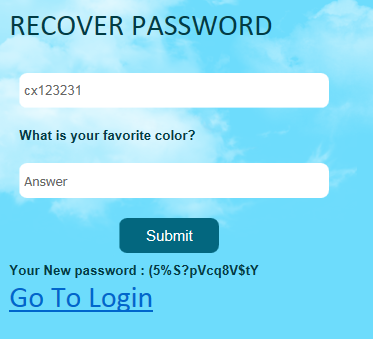
Now, the trainee can copy the new password and use it as a new password.
![]()
Click on the Go To Login label to proceed to the login page
Management Page
Master Page

The user will find a navigation bar that allows the user to move from one page to another page by using the menus.
Date & Time
The current date and time will be displayed at the top right of the window. (The time is in 24-hour format)
![]()
Username
The user will find the username displayed above the Date and Time.
Logout
The Logout icon is placed at the top right corner, and is available at all times.

Clicking on the Logout icon will end the session and direct the user to the login page.
Home Page
The Home page is the first menu in the navigation bar.
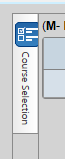
Icons
The Home page has icons that will direct the user to specific pages within the LMS.
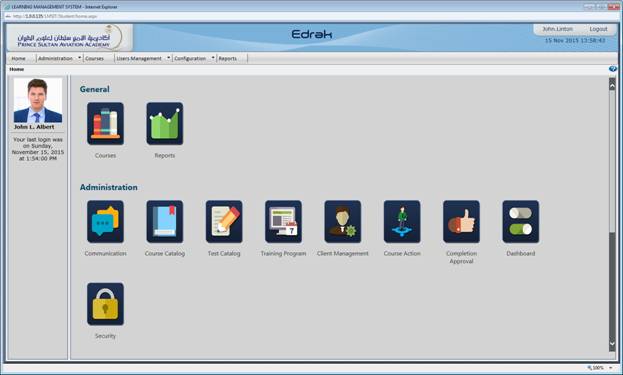
User Details
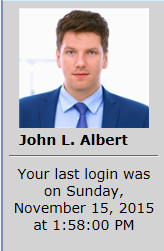
The user will find his/her details, such as full user name and the last time the user logged in to LMS, here.
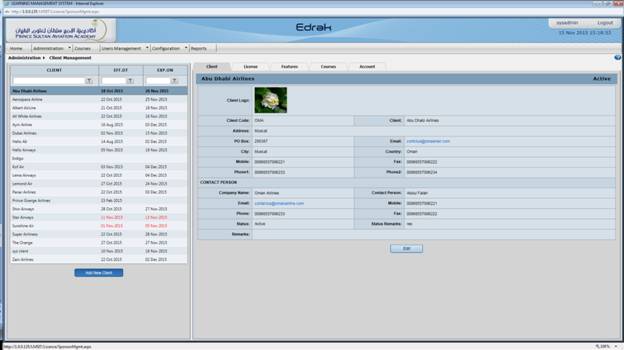
Client Management
The Client Management page can be found as a sub-menu in the Administration menu.
This page allows the user to register the sponsor on the LMS.
Client Management - General Tab
This tab allows the user to save general information about the sponsor.
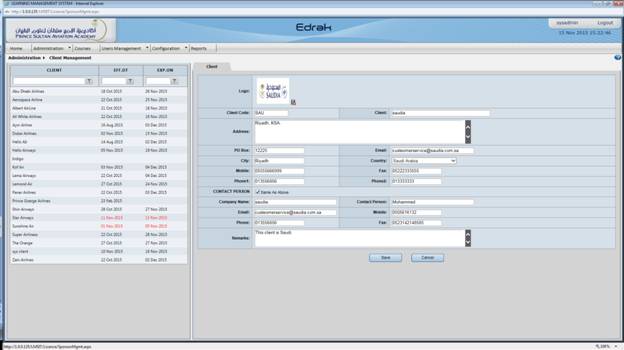
Now, click on the the Add New Client button.
![]()
Clicking on this button will display a form that needs to be filled out in order to complete sponsor registration.
The options in the Country Field is editable so the user can play with the data it contains via system configuration- Nationality

Fill in the general information about the client. Some fields, such as the Client Code, Client Name, Address, Phone 1 and Email, are mandatory.
The user can click on the Save or Cancel button.
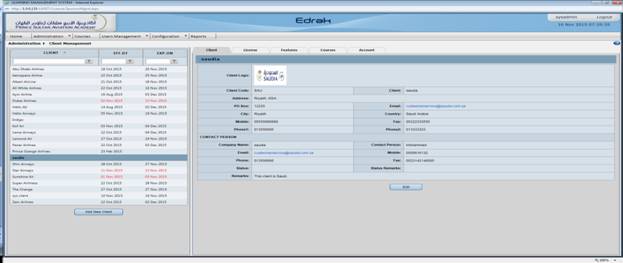
The user can edit the entered information at any time by selecting the sponsor from the list and clicking on the Edit button.
The user will notice that there is no effective or valid until dates for the created sponsor in the list, as this will be done in the License section.
Client Management - License Tab
This tab allows the user to create a license for the sponsor.
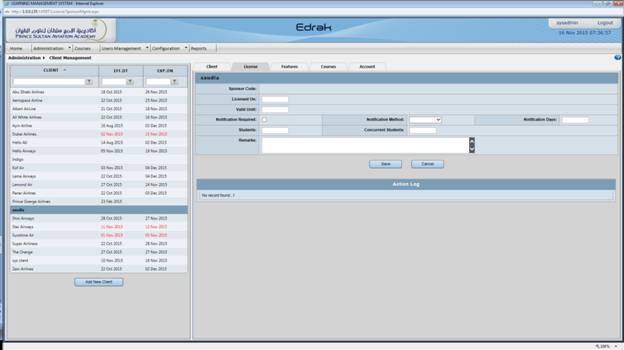
Licensed On represents the effective date of the license, the date from which the sponsor can start using the system.
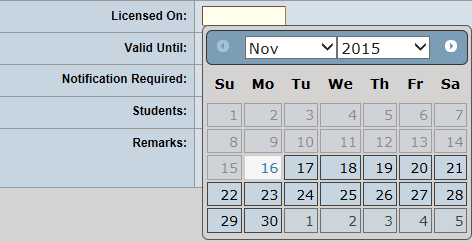
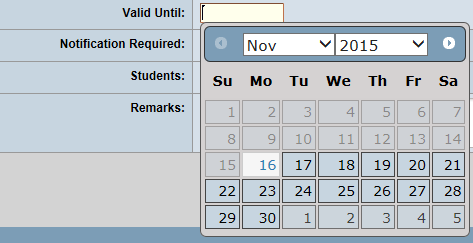
Valid Until represents the last day the sponsor is allowed to use the system.
Notification Required indicates whether the sponsor wants to receive notification before the license expires.
![]()
Notification Method indicates the preferred communication method for receiving a license expiration notification reminder.
Note: Ensure that SMS’s or Emails are set up and ready for use. (See the Notification Configuration)

Notification Days represent the notification time prior to the expiry date.
![]()
Trainees indicates the maximum number of Trainees allowed to register.
![]()
Concurrent Trainees is the maximum number of Trainees allowed to access the LMS at the same time.
![]()
Remarks allows the user to add comments related to the sponsor’s license
![]()
Since the form has been completed, we must click on the Save or Cancel buttons.
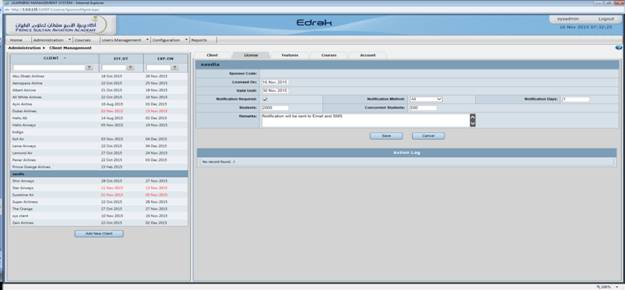
When clicking on the Save button, the user will notice that the action log has been changed. Every time the user updates the license, the action log will record the updates.

The user will notice now that there is a status at the top right corner that shows their status.
The user may have several statuses. They are:
ü Inactive: the Licensed On date has not yet arrived.
![]()
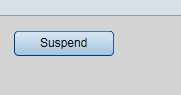
ü Suspended: if the user has clicked the Suspend button, located between the Form and Action Log.
![]()
ü Removed: if the user has clicked on the Remove button, located between the Form and the Action Log.
![]()
ü Active: the license has already started and has not yet expired.
Or
The license has been Resumed (The user will have a Resume button after the sponsor has been suspended)
![]()
Or
The license has been Revoked (The user will have a Revoked button after the sponsor has been removed)
![]()
ü Expired
![]()
Note: Clicking on the Suspend or Remove buttons will prevent all sponsor members from accessing the system.
Note: Clicking on the Resume or Revoke buttons will make the status Active.
Any action performed in the tab will be recorded for later reference.
Client Management - Features Tab
This tab will be explained later, once courses have been created. See Features Tab
Client Management - Courses Tab
This tab will be explained later, once courses have been created. See Courses Tab
Client Management - Account Tab
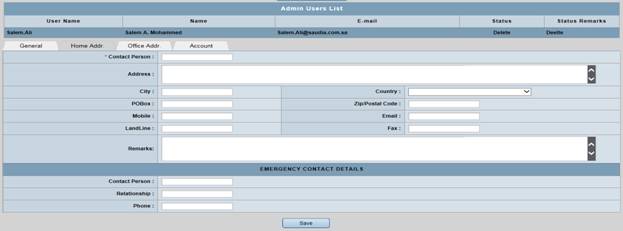
This tab allows the user to create a client admin account.
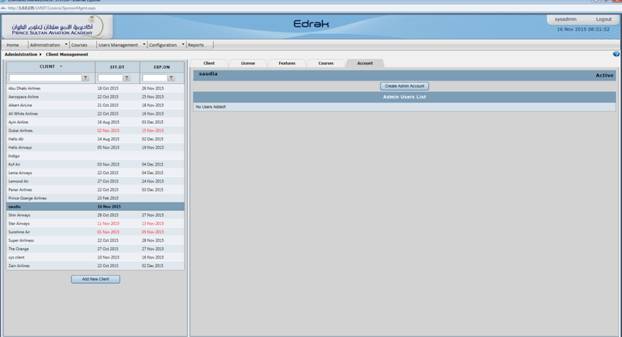
Click on the Create Admin Account button.
![]()
The user will now see a form like this:
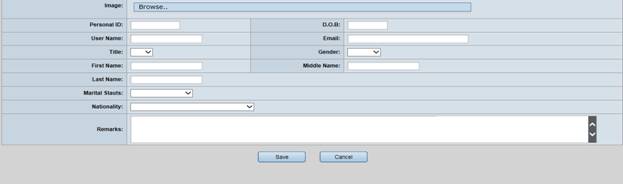
The user needs to fill in the form and then click on the Save or Cancel button.
![]()
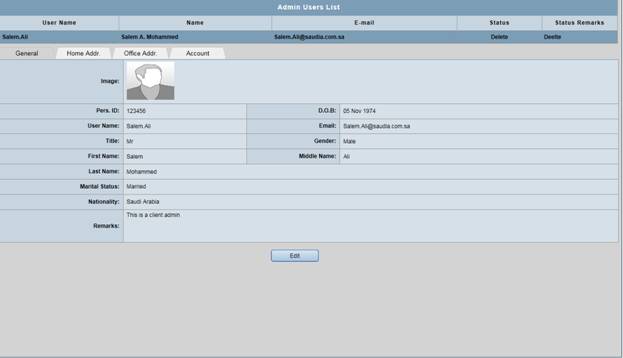
Fill out the form and click on the Save button. The user will notice that the client admin details are listed in the table.
![]()
The user may add as many client administrators as needed.
Clicking on Client Admin in the table produces a form with four tabs. The tabs are:
1. General Tab
2. Home Address Tab
3. Office Address Tab
4. Account Tab
Client Management - Account Tab - General Tab
This tab allows the user to add general client admin details.
The Title field can be customized on System configuration - Title
The Gender field can be customized on System configuration - Gender
The Marital Status field can be customized on System configuration - Marital Status
The Nationality field can be customized on System configuration - Nationality
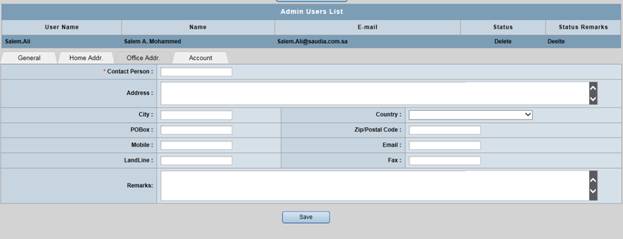
Client Management - Account Tab - Home Address Tab
This tab allows the user to add client admin home address details.
The Country field can be customized on System configuration - Nationality
Client Management - Account Tab - Office Address Tab
This tab allows the user to add client admin office address details.
The Country field can be customized on System configuration - Nationality
Client Management - Account Tab - Account Tab
This tab allows the user to set up a password for client admin.
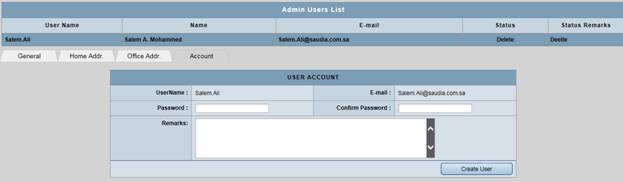
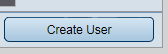
Click on the Create User button.
After clicking on the Create User button, the user will see this page:
The user can again reset the password.
Clicking on the Suspend button will enable the user to access the LMS.
After clicking on the Suspend button, the user will see a Resume button.
Click on the Resume button to allow the user to use the system.
The account can be deleted at any time.

The user can edit the Client at any time by selecting the client from the table to the left and clicking on the Edit button.
Note: the available pages for the client admin are Home and User Registration pages, but due to the flexibility of the system, the system administrator can add more pages to the client admin as needed.
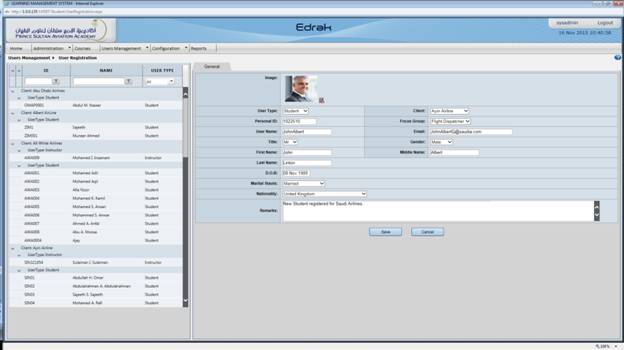
User Registration
The User Registration page can be found as a sub-menu in the User Management menu.
This tab allows the user to store general information about the Trainees or instructors.
Now, click on the Add New User button.
General Tab
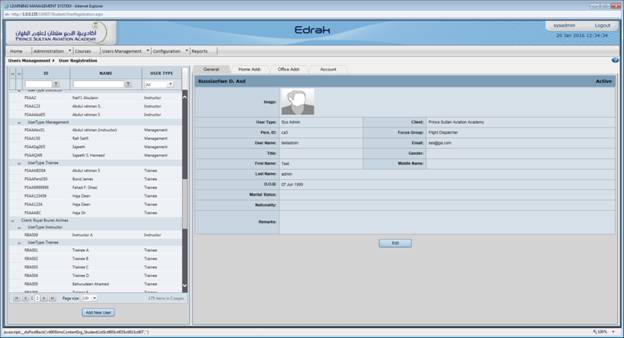
The user will see a form like this:
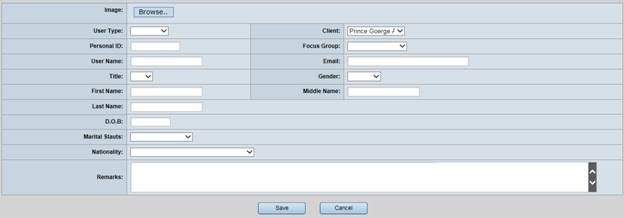
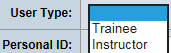
The user must fill in their General information on the form. Significantly, the user can select one of the user types available in the system: Trainee or instructor.
This is configured for the user to add other user types. This can be customized on System Configuration- User type
The user must choose a sponsor name from the list of sponsors available in the client field. This is retrieved from Client Management
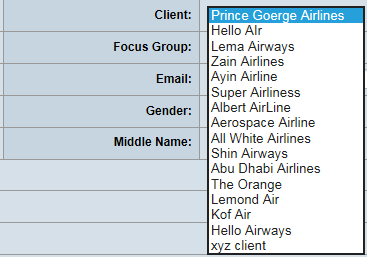
Note: Expired, Suspended, Removed and Inactive sponsors are not listed in the client list on the User Registration Page.
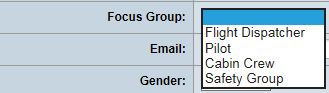
The user must choose a focus a group from the list of focus groups available in the focus group field. This can be customized on System Configuration- Focus Group
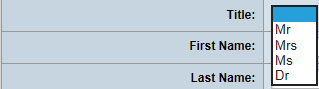
The user must choose a title from the list of titles available in the Title field. This can be customized on System Configuration- Title
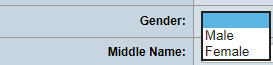
The user must choose a gender from the gender list available in the Gender field. This can be customized on System Configuration- Gender
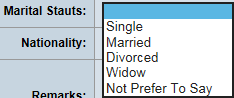
The user must choose a marital status from the list of marital status available in the marital status field. This can be customized on System Configuration- Marital Status
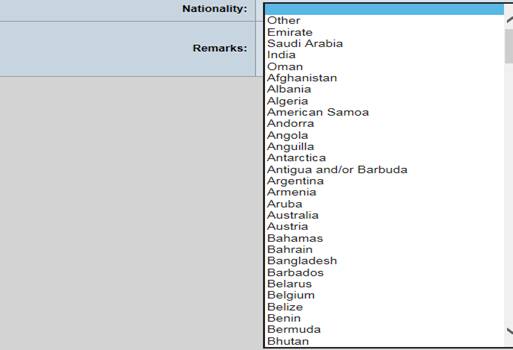
The user must choose a nationality from the list of nationalities available in the nationality field. This can be customized on System Configuration- Nationality
After completing the user registration form, the user must click on the Save or Cancel button.
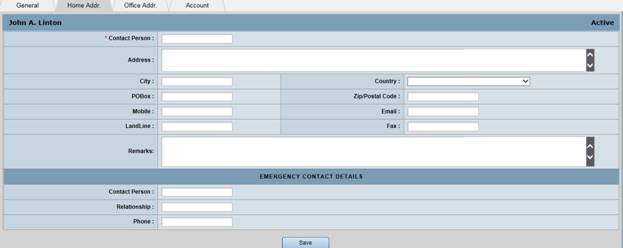
Home Address
This tab allows the user to save a Trainee’s home address details.
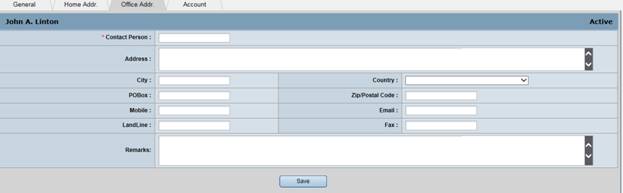
Office Address
This tab allows the user to save a Trainee’s office address details.
Account
This tab allows the user to set up a password for Trainees and instructors.
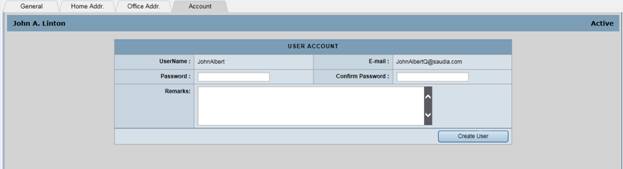
Now, the user can click on the Create User button to create a password for this user.
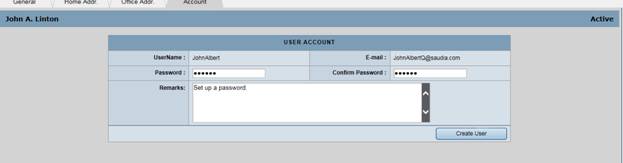
The user account has been created.

If the user refreshes the page, the user will see this page:
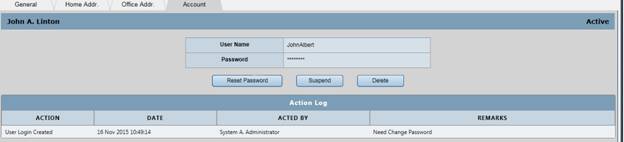
The user must reset their password.
Clicking on the Suspend button, the user will suspend the Trainee, and the Trainee will no longer have access to the LMS.
If the Trainee is suspended, there is a Resume button, which allows the Trainee to use the system again.
The account can be deleted at any time.
Note: Clicking on the Delete button deletes the account password.
If the user is Suspended or has Resumed, the status will be displayed at the top right corner, as shown here.
Suspended
![]()
Resumed
![]()
The user can select any user from the list, to update user details at any time.
1st Note: the available pages for the instructor are Home, Communication, Test Catalog, Course Action, Dashboard, Manage Users, Supervisor Configuration and Reports pages, but due to the flexibility of the system, the system administrator can add more pages to the instructor as needed.
2nd Note: for other User types –other than trainee and instructor- that will be added from the system configuration under User type, they will have a Home Page but system administrator can give them access to the other pages.
3rd Note: the available pages for the trainees are other than this as trainees will have access to different window.
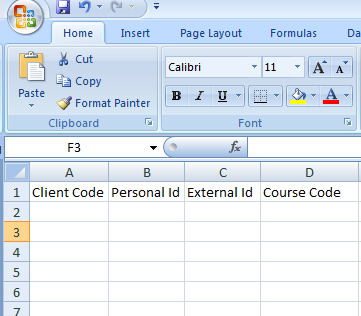
User Registration using Bulk Upload
The Bulk Upload page can be found as a sub-menu on the Configuraion menu.
This page allows the user to register a large number of Trainees at a time.
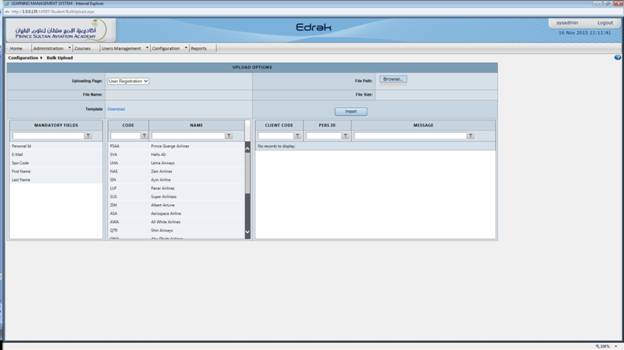
The user will start by downloading the template sheet by clicking on the Download icon.

The user will then save the file to their local PC.
Open the stored Excel sheet.
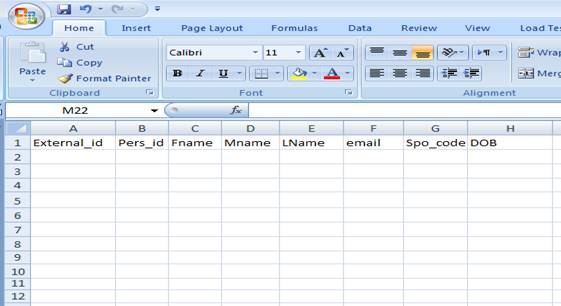
The user will need to fill in the required information.

Note: Ensure that the client code is correct and that the number of Trainees allowed for this sponsor is not yet exceeded (See License Tab for the client admin). Also ensure that there are no blank spaces on the Excel sheet.
After entering the Trainee’s details, save the work (Ctrl + S) and close the Excel sheet.
Now, click on the Browse button to select the Excel sheet.
![]()
Once the file is uploaded, the file name and size will show.
![]()
Click on the Import button to upload the Trainee details to the system.
![]()
This picture shows that the Trainee has been successfully registered and ready to access the system.

If the personal ID already exists in the system, the user will receive this message:

If the user has a sponsor code that does not exist in the system, the user will receive something like this:

Note: the username will be generated by the system and the password will be created by a default “123456”.
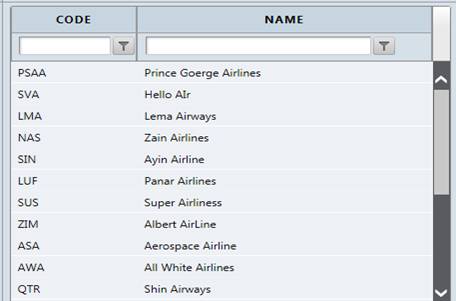
If the user does not remember the exact client code during the user registration, there will be a list on this page that shows all sponsor codes in order to complete the user registration.
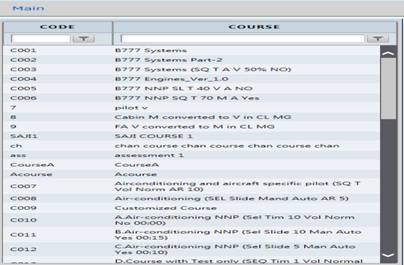
Course Catalog
The Course Catalog page can be found as a sub-menu on the Administration menu.
This page allows the user to create a course and view existing courses.
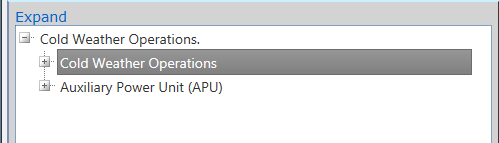
Introduction to Hierarchy Levels and Features
Note: all the courses are listed in the table to the left. Every course has a Course level, a Module level, a Lesson level, a Sub-lesson level.
This is a list of courses that were previously stored in the system.
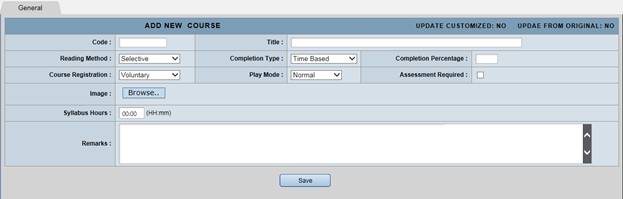
The user can add course details on this form.
Let us select the B777 Systems course.
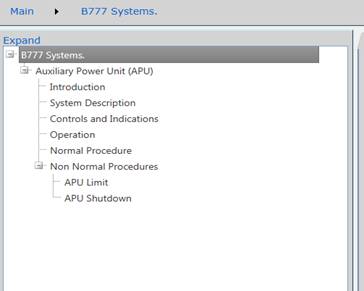
ü B777 Systems is the Course Level.
ü The Auxiliary Power Unit (APU) is the Module Level.
ü Introduction to Non-normal Procedures is the Lesson Level.
ü APU Limit and APU Shutdown are the Sub Lesson Levels.
Note: Each course has one or more modules. Each module has one or more lessons, and each lesson has one or more sub-lessons.
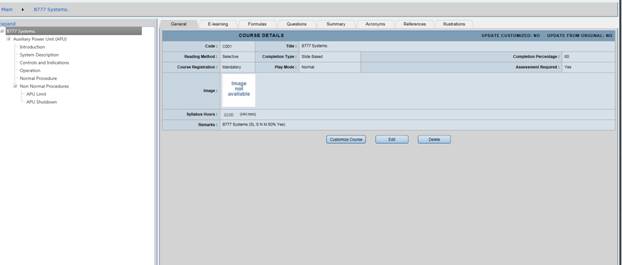
The Course level has tabs such as:
1. General 2. Elearning 3. Formulas 4. Questions
5. Summary 6. Acronyms 7. Illustrations
Similarly, the Module level has the same tabs:
1. General 2. Elearning 3. Formulas 4. Questions
5. Summary 6. Acronyms 7. Illustrations

The Lesson level has these tabs only:
1. General 2. Elearning

Similarly, the Sub-lesson Level has these same tabs:
2. General 2. Elearning

Course Level
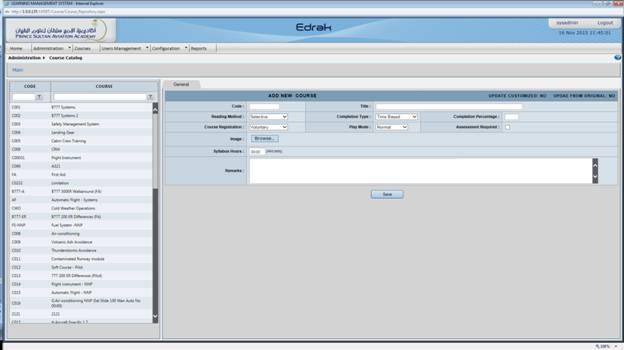
Let us add a new course and explain the features of each tab at each level.
General Features of the Course level
This feature allows the user to give specifications and standards for the course.
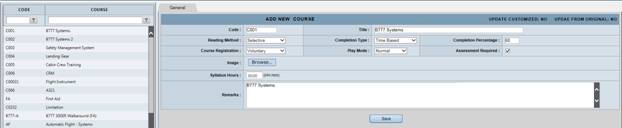
Code is the course code.
![]()
Title is the course title.
![]()
Reading Method:
ü Selective Mode will enable the Trainee to jump between levels, so the Trainee can start the course from anywhere they like.
ü Sequence Mode will only enable the Trainee to take the course from the beginning to the end of the course sequentially, lesson by lesson.
![]()
Completion Type:
ü Time Based: The Completion Percentage is calculated based on the time allocated to the course.
ü Slide Based: The Completion Percentage is calculated based on the number of slides in the course.
![]()
Completion Percentage refers to the percentage still required to finish the course.
![]()
Course Registration:
ü Voluntary means the course is optional.
ü Mandatory means it is required that the Trainee complete the course.
![]()
Play Mode:
ü Normal means clicking on the Next button isrequired to move from one slide to another.
ü Auto means clicking on the Next button is not required to move from one slide to another, as the course will carry on until the end of the course.
![]()
Assessment required applies to the passing percentage of the assessment that is stored in the module. Level (See the Passing percentage)
![]()
Image is just an image for the course.
![]()
Syllabus Hours refers to the actual course duration.
![]()
Remark refers tocomments stored as a remark for this course for later reference.
![]()
Click on the Save button to save the course and the course will be added to the left side of the table.
Elearning features of the Course level
Here, the user can upload the SCORM file, which is the actual course.

Click on the Browse button to upload the SCORM file.
![]()
Once the file is uploaded, the user will see these fields:
![]()
Formula features of the Course level
The user may upload one or more formulas that will be available to the Trainees when taking a course.
Now, click on the Add button.

The user can add a text or a file, or both, as a formula for this course.
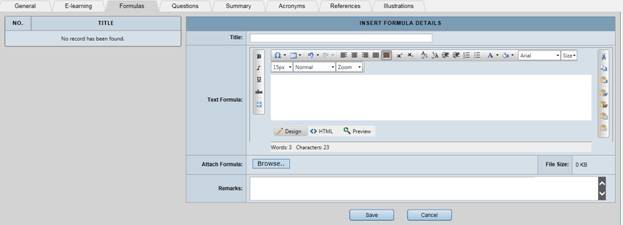
Title
![]()
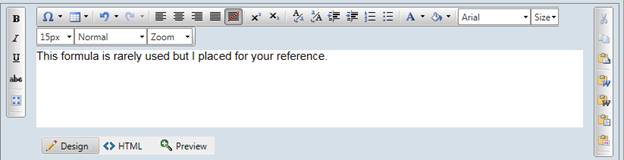
Text Formula
Attach Formula
![]()
Remarks
![]()
The user must click on the Save or Cancel button.

Once saved, the user will notice that the formula that has just been created is added to the list.
Question features of the Course level
This tab allows the user to store questions in the course. They will be available for Tests. (See Test Catalog page)
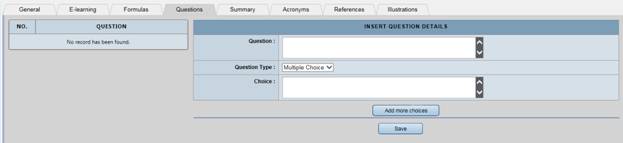
The Question text area allows the user to enter a question.

Question Type allows the user to select one of the two types of question available: Multiple Choice or Multi Select.
![]()
Choices allows the user to enter four answers

Now, let us add a multiple choice question.

Select the multiple choice question.
![]()
Now, choose the answers that the user wants to display in the Assessment and the Test one by one.

After adding the first answer, click on the Add more choices button.
![]()
The user will notice that the choice has been added below the Add more choices button.

Repeat the same steps to add more answers. A maximum of four choices can be added per question.
Once the user finishes adding the answers, the user may select the correct answer by selecting the radio button if the question is a multiple choice question, or ticking the checkbox if the question is a multi select question.
Remember to click on the Save button.
![]()
The user may select any answer and click on the Remove button to remove the answer from the answer list.
Clicking on the Save button will add the question to the list.
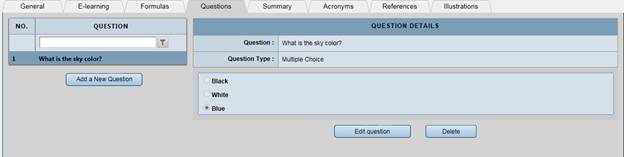
Selecting any question from the list will display three buttons: Add a New Question, Edit question and Delete.
This button allows the user to repeat the steps for adding a question and add a new question for the Course level.
![]()
This button allows the user to edit the question and the answers that were previously added for the selected question.
![]()
This button allows the user to delete the selected question.
![]()
Summary Features of the Course level
The user may upload a summary for the course level.
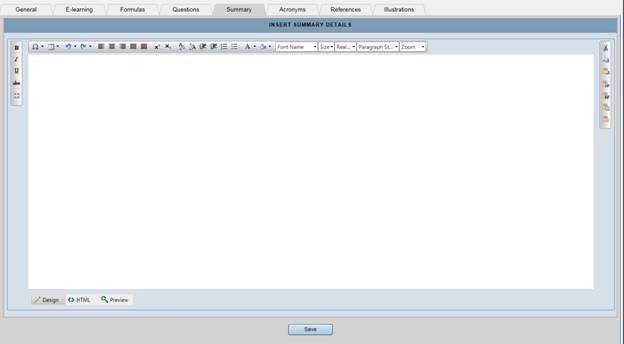
Once the user enters a summary for this course, they must click on the Save button to save the summary.
After saving the summary, the summary will be displayed like this:
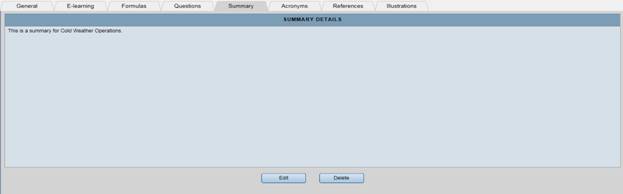
The user can edit or delete this summary at any time.
Note: the user cannot have more than one summary for each course.
Acronym Features of the level

The user can add as many acronyms as needed.
The user can enter an acronym and a full description.

The user can remove acronyms at any time by clicking on the remove icon
![]()
The user can click on the Save Icon to save the acronym created.
![]()
After clicking on the Save icon, the acronyms will be listed like this:

The Add icon will allow the user to add acronyms.
![]()
Reference Features of the Course level
Reference is commonly used for the outsourced content that needs an attention by the Trainee.

Reference title:
![]()
Reference Type:
The user can select from two types available for reference.
ü Site indicates that the reference is a link to an outsourced site.
ü File indicates that the reference is a file that needs uploading from the user’s local PC.
![]()
Site:
The user must enter a URL.
![]()
File:
The user must upload a file from their local PC.
![]()
Remarks:
Comments can be stored for later reference.
![]()
The user may click on the Save or Cancel buttons.

Saving will list the entry on the reference table.

This icon allows the user to open the reference link, whether a site or a file, in a separate window.
![]()
The user can add as many references as needed for this course.
Illustration Features of the Course Level

Title:
![]()
Content:
![]()
After clicking on the Browse button, the user must select a file from their local PC.
![]()
Once the upload is complete, the user must click on the Save button.
![]()
The illustration for this course has been added to the table.
Note: Formulas, Questions, Acronyms, References, and Illustrations that are in the course level, will also be displayed in the module level, lesson level and sub lesson level. Summary Features will be displayed if there is no summary in the Module level.
Module Level
Every course must have one or more modules.
General Features of the Module level
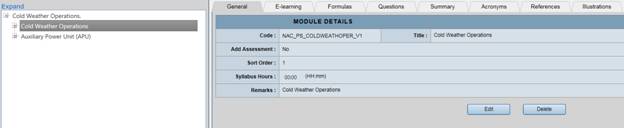
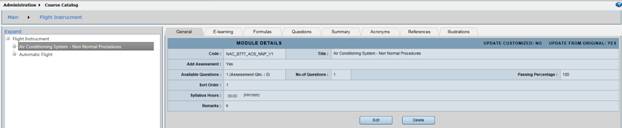
Code:
The course code will be retrieved from the SCORM file when the course is uploaded to the Course level. It can be edited.
![]()
Title:
The title code will be retrieved from the SCORM file when the course is uploaded to the Course level.
It can be edited.
![]()
Add Assessment:
No means that there is no assessment at the end of this module level.
![]()
Yes means that there is an assessment at the end of this module level.
Note: each module can have no or one module only at the end of the module.
![]()
Available Questions means the total number of questions available in this level. See Question feature for module Level
This is automatically calculated by the system; the user does not have to do anything at this stage.
No. of Questions means the number of questions the user wants to use.
Note :If No. of questions is greater than the available questions, the Trainee will see only the number stated in the No. of questions.
If No. of questions is less than the available questions, the Trainee will see only the available questions.
Passing Percentage mean the percentage required to pass this assessment.
Sort Order controls the module order; i.e. if the user has two modules or more, this option allows the user to arrange the modules in a specified sequence order.
![]()
Syllabus Hours refers to the duration of this module.
![]()
Remarks are comments that are kept for later reference.
![]()
Elearning Features of the Module level
This formula is similar to the formula in the Course level; and will be displayed in the Module level.
Formula Features of the Module level
This formula is similar to the formula in the Course level; and will be displayed in the Module level.
Question Features of the Module level
These are quite similar to the questions in the Course level. There is one more option available in the Module level, the Assessment Required option.
This option will allow the user to select the questions needed for the assessment. This means that questions with a checked Show in Assessment option will be displayed in the assessment.
Summary Features of the Module level
If there is no summary in the Module level, the summary of the Course level will be displayed in the Module level.
Acronym Features of the Module level
This acronym feature is similar to the acronym feature in Course level, but it is displayed in the Module level.
Reference Features of the Module level
This reference feature is similar to the reference feature in the course level, but it is displayed in the Module level.
Illustration Features of the Module level
This illustration feature is similar to the illustration feature in the course level, but it is displayed in the Module level.
Lesson Level
General Features of the Lesson level
Since the course has been uploaded in the Course level, the Code, Title, Sort order and Remarks will be retrieved from the course itself.
The user can edit these fields at anytime.
Note: The user can arrange the lesson sequence within the modules.

Elearning Features of the Lesson level
Since the course has been uploaded in the Course level, the File Name, File Size, Open Content in New Window, SCORM Content and Remarks will be retrieved from the Course level. Remember that this is editable.

Sub-lesson Level
General Features of the Sub-lesson level
Since the course has been uploaded in the Course level, the Code, Title, Sort Order and Remarks will be retrieved from the Course level. Remember that this is editable.
1st Note: The user is allowed to re-arrange the lesson sequence within the modules using the Sort Order option.
2nd Note: Formulas, Questions, Summaries, Acronyms, References, and Illustrations in the Course level and Module level will be displayed in the Lessons level and Sub-lessons level. Essentially, if there is no summary in the Module level, then the summary in the Course level will be displayed in the lesson level and Sub-lesson level.

Elearning Features of the Sub-lesson level
Since the course has been uploaded in the Course level, the File Name, File Size, Open Content in New Window, SCORM Content and Remarks will be retrieved from the Course level.
The user can edit these fields at any time.

Customizing a course
This page allows the user to choose modules, lessons, and sub-lessons from other courses.
Select any course then click on the Customize Course button.
After clicking on the button, the user will see this page.
This page allows the user to select a module, lesson, or sub-lesson from courses that are already in the system.
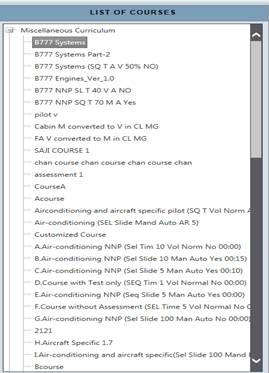
These are examples of courses available in the LMS.
Now, select a course
and click on the ![]() icon to move the course to the box on
the right in order to select a module, lesson, or sub-lesson from
the course.
icon to move the course to the box on
the right in order to select a module, lesson, or sub-lesson from
the course.
The user can select any
module, lesson, or sub-lesson from this course by checking the
checkbox of the items they want to add. Once a selection has been
made, click on this ![]() icon.
icon.

Now the selected items whether Modules, lessons or sub lessons are added successfully. To ensure that the selected items have been added, please see the box on the right.
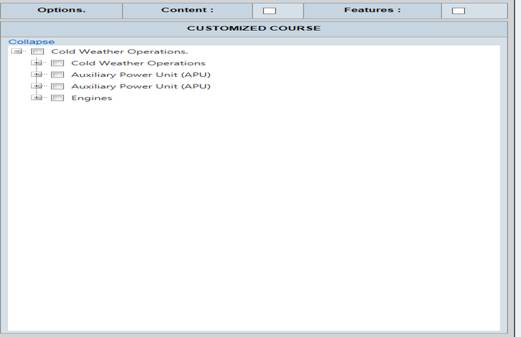
The selected item, in this case the engine, has been added to the current course.
Now, the user must click either the Save or Cancel button.
Clicking on the Save button will save the current course, as shown on the box.
Content and Features
Content means the content in General and Elearning Tabs.
Features means the content of Formulas, Questions, the Summary, Acronyms, References and Illustrations tabs
After moving the selected items to the box at the extreme right, the user may want to check the Content checkbox to copy components of the selected General and Elearning item(s) to the current course.
![]()
After moving the selected items to the box at the very right, the user may want to check the Features checkbox to copy components of the Formulas, Questions, Summary, Acronyms, References and Illustrations of the selected item(s) to the current course.
![]()
Update Customized & Update From Original
Before explaining the two tools Update Customized and Update From Original, the user needs to understand the two terminologies:
Customized Course: is the course that has been customized from the courses available in Course Catalog Page, using the Customize Course Page.
Original Course: is a course that has been uploaded from the Elearning Feature.
Now, the user may understand this:
![]()
This helps the user to know if there is any modification made to the courses the that has been customized and the original course that has been customized from, so this feature allows the user to know if any modification will reflected in the other course or not.
1st Note: this feature will work in all levels except the course level.
2nd Note: the feature will work if the Content checkbox is ticked during the course customization.
|
Update From Original |
|||
|
Yes |
No |
Yes |
No |
|
Means the Original Course will update the General and Elearning Features of the customized course when changes are made to General and Elearning Features of the Original Course. |
Means the Original Course will NOT update the General and Elearning Features of the Customized Course when changes are made to General and Elearning Features of the Original Course. |
Means the Customized Course will be affected if any changes are made to the Original Course. |
Means the Customized Course will NOT be affected if any changes are made to the Original Course. |
Assessment
Assessment is a set of questions that can be given to the trainees at the end of each module.
To attach the assessment in the module the user needs to:
1. Select the course that the user wants to have the assessment in.
2. Select the Module that the user wants to have the assessment in.
3. Select the Question features of the Module Level.
4. Add questions to the module.
5. Tick the Show In Assessment option to give the question more priority.
6. Go to General Feature of the Module Level.
7. Tick the Add Assessment option to show the assessment at the end of the module.
8. Enter the number of questions needed for this module in No. of Questions option.
9. Enter the percentage required for this assessment in Passing Percentage option.
10. Select the course level.
11. Tick the Assessment Required option to apply the passing percentage entered in number 9.
Test Catalog
The Test Catalog page can be found as a sub menu in the Administration menu.
The user will be allowed to create a test based on the questions we have in the course catalog.
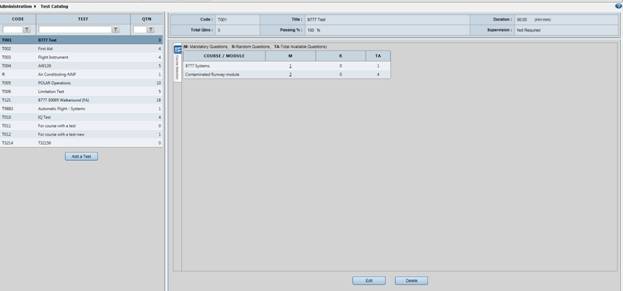
This table shows the previously created tests available in the LMS:
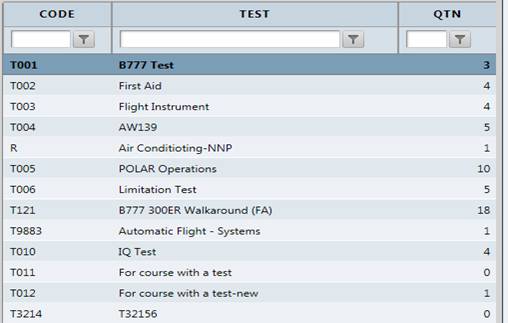
Now, click on the Add a Test button to create a new test.
![]()
The user will see this page:
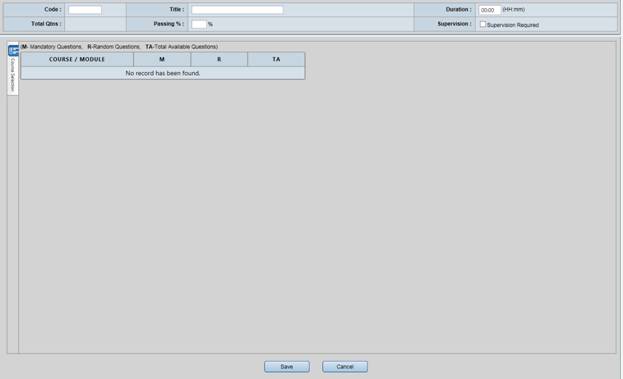
Code means the test code.
![]()
Title
means the test
name.![]()
Duration means how long the test will take.
![]()
Total Qtns means the total number of questions in the test (once the questions are selected, the system will calculate the total number of questions).
![]()
Passing % means the Trainee should meet the passing percentage required in order to pass the test.
![]()
Supervision Required: Checking Supervision Required willrequire the Trainee to enter the password required to attend the test (see Supervisor Configuration – pass code)
![]()
The user will notice that Course Selection appears in this page:
Course Selection displays the courses and questions available.
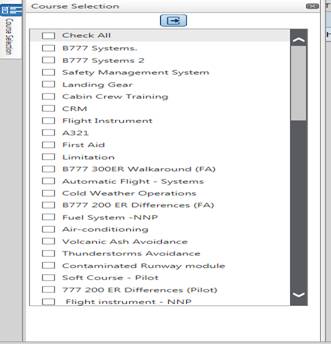
As explained, every
course has a questions saved in the question tab. Select the course
that has the questions needed in order to use them in this test.
Click on this ![]() icon to
select the required course.
icon to
select the required course.
The user will notice that the course has been added like this:

Note: Selecting a course from the course selection will select the modules for the course.
COURSE/MODULE means the course name or the course name and module name separated by “/”.
M means the mandatory questions that the user wants to add. This option allows the user to specify a particular question in the course or module.
R means total number of random questions the user wants to include in the current test. This option allows the LMS to select any question randomly from a specific course.
TA means the total number of questions available in the Course level or Module level. For more information, please check the question feature for the course and module levels in Course Catalog Page
Note: the Mandatory Questions (M) and Random Questions (R) should not be greater than the number of Total Available Questions (TA).
The user can select a question that should be in the test by clicking on the number of questions in the M column.

Clicking on the number in the M column will display the question.
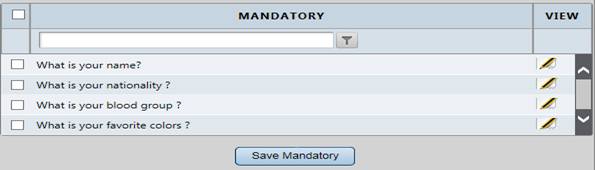
The user can select the mandatory questions that should be in this test by checking the checkbox beside each question.
![]()
The user must then click on the Save button.
![]()
This icon allows the user to view the question and the answers for this question.
![]()
Clicking on this question will display the question details.
Now, selecting any test will show two buttons: Edit and Delete.
![]()
When a user has made a modification to the test, the user will notice that the test has this icon:
![]()
Once the test is created, the test will be shown in:
· Supervisor Configuration-Pass Code
· Test Field in Training program
Training Program
The Training Program page can be found as a sub-menu in the Administration menu.
This page allows creating a curriculum, using a copy of the courses retrieved from the miscellaneous curriculum in order to organize them.

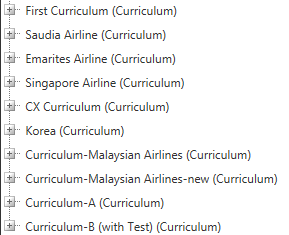
This table has one main curriculum, called the Miscellaneous Curriculum, which holds the entire LMS curriculums.
Any changes to the list will be reflected in Client Management- Courses, Focus Configuration, and Course Enrollment
![]()
The other curriculums have been previously created by the user.
The similarities and differences between miscellaneous curriculum and other curriculums
|
Miscellaneous Curriculum |
Other Curriculums |
|
Already created by the system and retrieved from course catalog |
Should be created by the user |
|
By default, contains only courses. |
Once the curriculum is created, the curriculum has no courses. So the user has to add the courses manually. |
|
The user can attach a Test with the Course. |
The user can attach a Test with the Course. |
|
The user can attach a test to the curriculum which means an individual test |
The user can attach a test to the curriculum which means an individual test |
|
Whatever changes made in this curriculum, it will be shown in the Course Enrollment page, Client Management page and Focus Configuration page. |
Whatever changes made in this curriculum, it will be shown in the Course Enrollment page, Client Management page and Focus Configuration page. |
|
The user can not add a segment inside the curriculum. |
The users can a segment inside the curriculum. Also, the user can add a segment inside a segment and add a course, test and course with test inside the segment. |
Selecting a curriculum will allow the user to display the details of the curriculum, such as Content Type, Code, andTitle.

Click on the Add New Curriculum button to initiate a new curriculum.
![]()
After clicking on the button, the user will notice that there is a small form that needs to be filled in.
The Code and Title for this curriculum should be typed in to initiate the new curriculum.
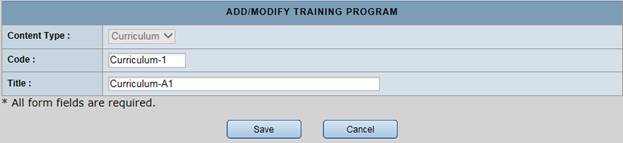
Now, the user must click on the Save or Cancel buttons.

After clicking on the Save button, the user will have a curriculum listed in the table without any courses.
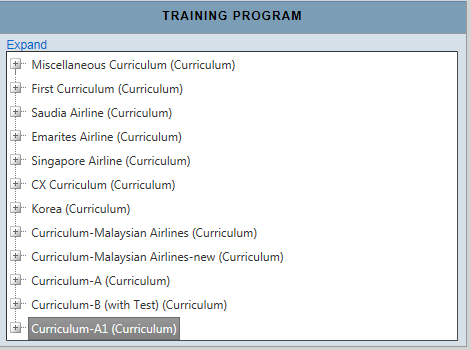
If the user maximizes the curriculum, the user will have no data attached, as nothing has yet been added to this curriculum.
![]()
Selecting the curriculum will show the details of the curriculum, as we explained previously.
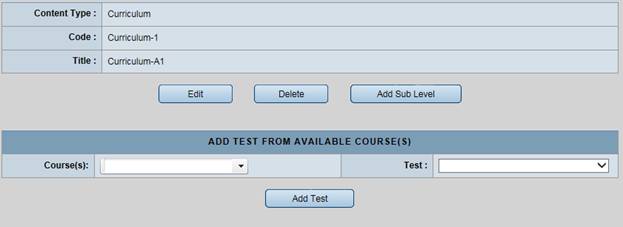
There will be three buttons visible:
ü The Edit button will allow then the user to edit the Code and the Title of this curriculum.
ü The Delete button will allow the user to delete the curriculum.
![]()
ü The Add Sub Level button will allow the user to create a segment (sub-curriculum used for grouping) or add a Course from the courses available in the LMS.
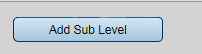
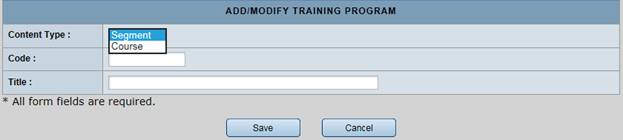
Clicking on this button will display a page like this:
This page will allow the user to create a course and a segment inside the selected curriculum.
The user must select the same curriculum in order to show this form:

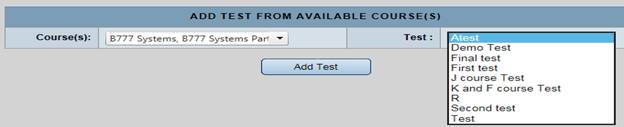
Now, the user must select the course that has the test questions in order to add the test.
OR
The user must check all the courses to see the available tests in the system.


The user may also attach a test to the course by:
ü Selecting a particular curriculum (miscellaneous curriculum or other curriculum)
ü Maximizing the curriculum
ü Selecting the course with which the test will be associated
ü Assigning the test to the course
Client Management
The Client Management page can be found as a sub-menu in the Administration menu.
The sponsor will be able to assign Courses, Tests, and Course associated with Tests.
Client Management - Features Tab
This tab allows the sponsor to restrict the features that the Trainee will have access to during course reading time (see Trainee Course Page).

Click on the add icon ![]() to select the feature will make the feature
available for the Trainee.
to select the feature will make the feature
available for the Trainee.
Now, the user will add no or all features.

Click on the save icon to save the feature, or click on the cancel icon to remove the feature.
Example:
Trainee will see the acronyms if the user:
Adds the acronyms to the course from course catalog for either way course level or module level
Adds the course to Client Management - Courses
Enroll trainee to the course to see the acronym feature in the Trainee page.
Client Management - Course Tabs
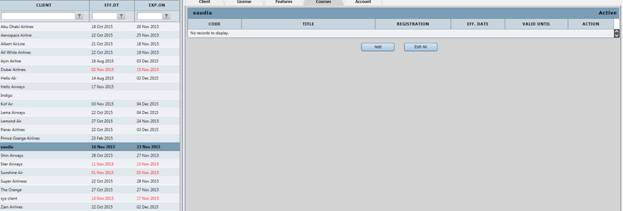
There are two buttons:
The Add button will show a window with a list of the Courses, Tests, and Courses with Tests.
![]()
Clicking on the Add button will display this page:
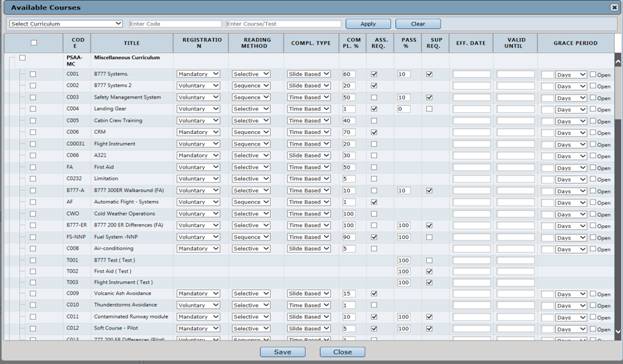
Code is the code for the test, course, and course with tests.
Title is the title of the test, course, and course with tests.
The user may override the content that we selected in Course Catalog under General Tab.
Registration wasexplained previously (see Course Catalog under General Tab).
Reading Method wasexplained previously (see Course Catalog under General Tab).
Completion Type was explained previously (see Course Catalog under General Tab).
Completion Percentage wasexplained previously (see Course Catalog under General Tab).
Assessment Required was explained previously (see Course Catalog under General Tab).
Supervision Required wasexplained previously (see Course Catalog under General Tab).
Effective Date is the date the Course, Test, and Course with Tests becomes valid.
Valid Until allows the user to set an expiry date for the Course, Test and Course with Test.
Grace Period is the number of days the Trainee can review the course after course completion.
The user will select the Course, Test and Course with Tests by checking the checkbox beside the Code column.
The user must click on the Save or Cancel button.
![]()
The Edit All button will allow the user to edit all the client’s items.
![]()
These are the items that will be displayed here:
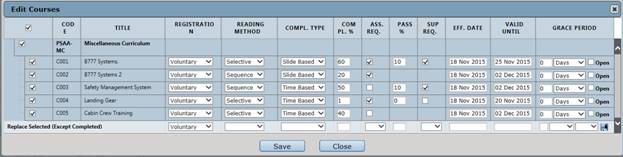
The user can edit them all at once by changing the fields of each Course, Test, and Course with Test.
Then click on Save.
The user can use the last row to unify the components in the General tab in the Course, Test, and Course with Test.
Once this is finished,
the user must click on the ![]() save icon to save the
selection.
save icon to save the
selection.
Alternatively, the user may edit each item individually by clicking on the edit icon
![]()
Clicking on this icon ![]() will display a window like this:
will display a window like this:
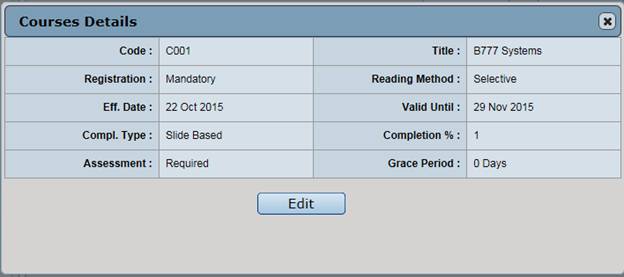 Clicking
on the Edit button will allow the user to edit the
details of the selected item.
Clicking
on the Edit button will allow the user to edit the
details of the selected item.
![]()
This ![]() is the Removed icon, which allows
the user to remove an item from the available courses for this
client.
is the Removed icon, which allows
the user to remove an item from the available courses for this
client.
This pop up box allows the user to change the course details that has been entered previously in Course Catalog - General
Any changes made on this pop up will NOT be reflected in Course Catalog Page at all.
Course Enrollment
The Course Enrollment page can be found as a sub-menu on the Users Management menu.
The user will enroll Trainees on this page:
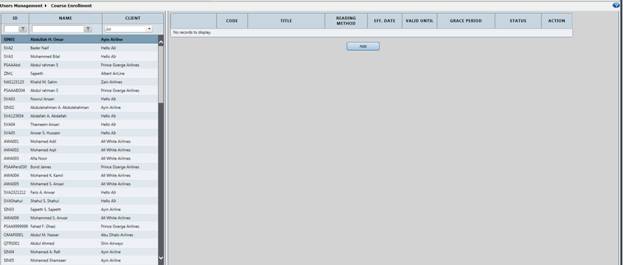
The table shows all the Trainees registered on the LMS.
If the Trainee’s name is not listed, then the user needs to check:
· The sponsor that the Trainee belongs to, as there is a chance for the license of the sponsor to be expired, removed, suspended, inactive.
· The Trainee has been deleted.
Now, select any Trainee and click on the Add button to add a Course, a Test, or Course with a Test.
![]()
It will show only the Courses, Tests and Courses with Tests that are available to the client.

This list is retrieved from the Client Management page – Coursesas the sponsor is solely has permission to this list.
Select the Course, Test, and Course with Test.
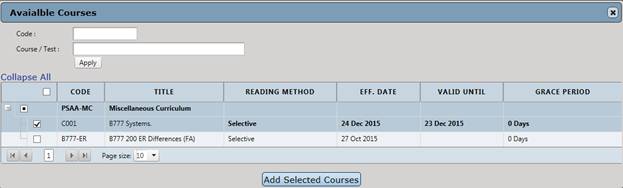
Click on the Add Selected Courses button.
![]()
Clicking on this button will add the courses that were selected.

The user may remove
this course by clicking on the remove icon![]() .
.
· In order to delete a course the course status must be Scheduled or Course Completed.
· In order to delete a course the test status must be Scheduled or Test Completed.
· In order to delete a course with test the status must be Scheduled or Course Completed.
Note: if the course is voluntary and the user assigns the course to a Trainee, the course will be mandatory for that Trainee and the Trainee will find the course under My Courses, but if the user assigns the voluntary course to the client and not assigning the course to the trainee, the course will be shown to the Trainee under available courses
In order to see the course listed under Available Courses Tab in the trainee page:
Ensure that the course is assigned to the client only. Client Management - Courses
Do NOT enroll the Trainee to the course. Course Enrollment
Ensure that the course has a focus group. Focus Configuration
Ensure that the Trainee has the same focus group that the course has. User Registration - General
Trainee Enrollment Using Bulk Upload
The Bulk Upload page can be found as a sub-menu on the Configuration menu.
If there are a large number of Trainees to enroll, the sponsor may enroll all the Trainees at once, using the bulk upload.
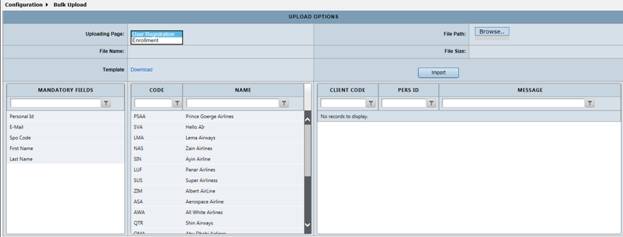
Change the Uploading Page to Enrollment.
The sponsor may start by downloading the template sheet by clicking on the Download label.
Then, the user may save the file to the user local PC.
Open the saved Excel sheet.
The user must fill in the following required information:
![]()
Note: Ensure that the client code is correct. Also, ensure that there are no empty spaces left in the Excel sheet.
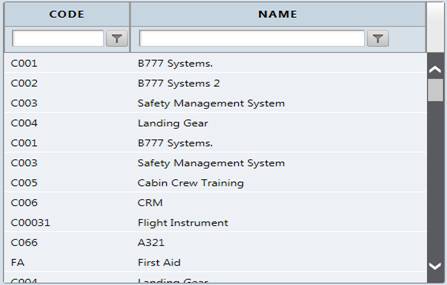
Ensure that the course code is correct. The user can quote the Course Code from this table:
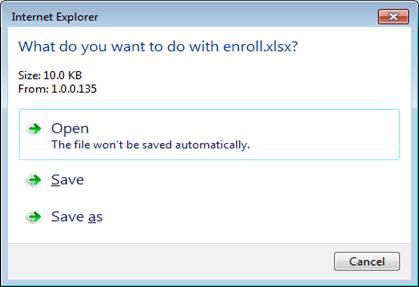
The user may now save the work (Ctrl + S) and close the Excel sheet.
Now, the user can click on the Browse button to select the Excel sheet.
![]()
Once the file is uploaded, the user will see the file name and file size.
![]()
Now, the user can click on the Import button to upload the Trainee’s details.
Once the program has been uploaded, the user will receive a message like this:

If the same Personal ID does not exist for this client:

If the Course, Test or Course with Test are not available for this sponsor:

If the Trainee has
recently been enrolled for this program:
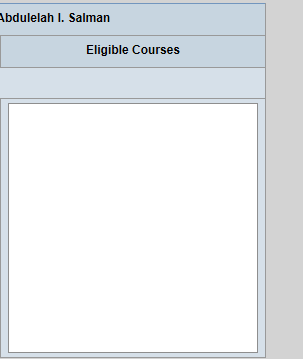
Instructor Qualifications
The Instructor Qualification page can be found as a sub-menu on the Users Management menu.
Allow the sponsor to assign courses to a qualified instructor or tutor.
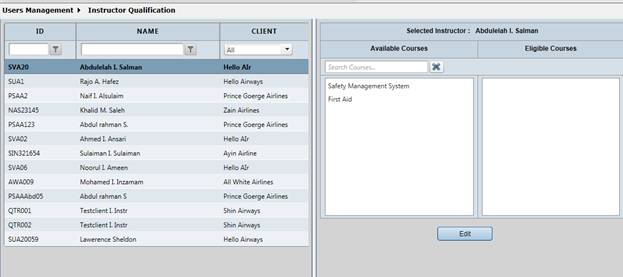
This is a list of instructors available in the LMS and those instructors are retrieved from the User Registration page

The courses available to the sponsor are listed here:
Note: the courses available here are retrieved from the Client Management - Courses
The courses that the instructor has qualified in should here:
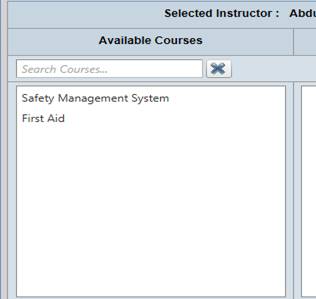
Select an instructor from the list on the left.
![]()
Click on the Edit button.
![]()
The user will now see this:
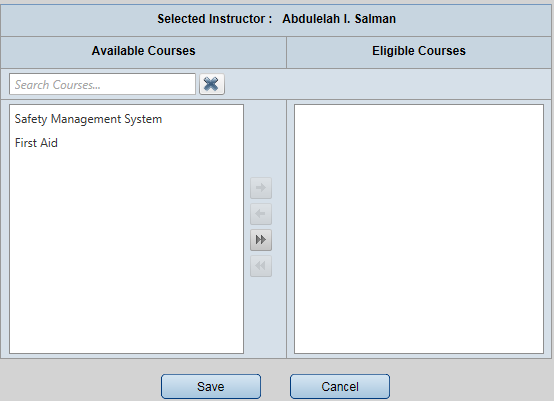
Select a course from the available courses.
Move this course to the
left, using this icon: ![]()
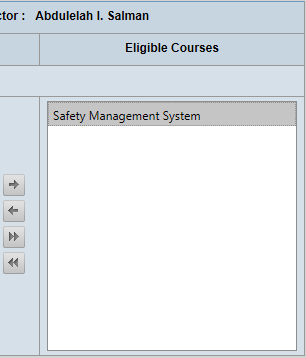
![]() is used to move the selected course(s) to the
Eligibile Courses.
is used to move the selected course(s) to the
Eligibile Courses.
![]() is used to move the selected course(s) to
Avialable Courses.
is used to move the selected course(s) to
Avialable Courses.
![]() is used to move all the courses to Eligibile
Courses.
is used to move all the courses to Eligibile
Courses.
![]() is used to move the courses to Avialable
Courses.
is used to move the courses to Avialable
Courses.
Communication
The Communication page can be found as a sub-menu in the Administration menu.
Communication - Notes
Notes are actually any message that is sent from the course by the Trainee.
Note: in order to receive a message, the instructor needs to be a qualified in the course.

Trainee: The table shows the name of the Trainees who send a note from the courses in which they are already enrolled.
Note: The note that a Trainee sent.
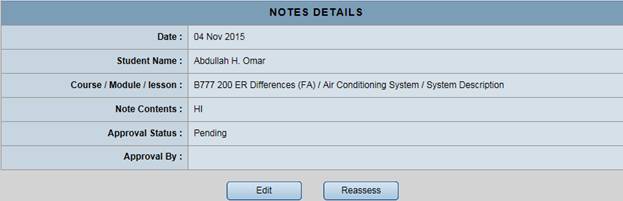
Approval means the status of a note. We have three statuses for notes. They are:
ü Pending: the Trainee has sent a note
ü Approved: the instructor agrees to show the note to the other Trainees
ü Rejected: the note will not be shown to the other Trainees
Selecting any note from the table will show the details of the note.

These are the details of the note:
Click on the Edit button.
![]()
The user will see a form like this:
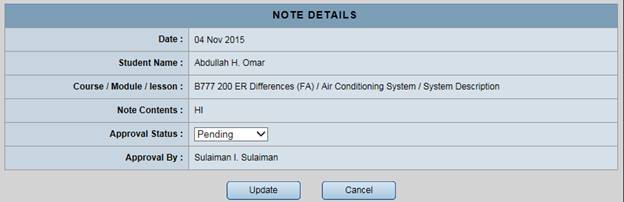
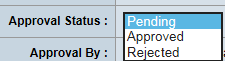
The user will be able to change the status to:
Now, the user can click on the Update or Cancel button.
Update will apply the changes made to the status.
Reassess is only used to change the status from Approved or Rejected to Pending
![]()
|
Private Note |
Public Note |
|||||||||||||||
|
qualified instructor has no control on the private note |
qualified instructor has control on the public note. |
|||||||||||||||
|
Only the Trainees will view the note. |
|
To receive a note:
Ensure that the course is assigned to the sponsor Client management-Courses
Ensure that the course Trainee is enrolled in the course. See Course Enrollment
Ensure that the instructor is qualified in the same course. See Instructor Qualification
Ensure that the Trainee creates a note from the same course. See Trainee page- Notes
If the note icon is not shown in the Trainee page please check Client Management- features
Communication - Notice Board
This page allows a qualified instructor to create a message for the courses for which they are qualified for their Trainees.

The user will notice that the instructor has a list of Notice Boards that have been previously created.
![]()
Effective Date is the date on which the Notice Board will be displayed to the Trainees.
Expiry Date is the date from which the notice board will be no longer available to the Trainees.
Description is the actual Notice Board.
Selecting the Notice Board from the list will display details of the Notice Board.

The table will show the same details, including the course name to which the notice board has been sent.
Now, click on the Add button to add a Notice Board.
![]()
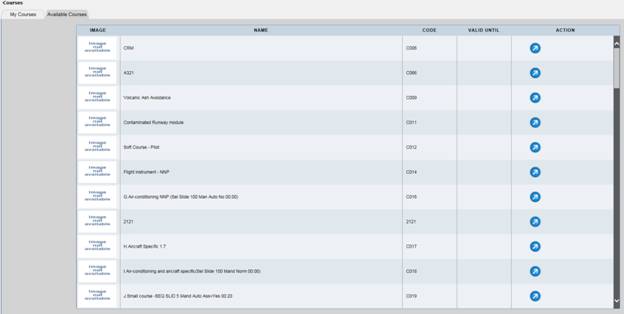
The user will notice that only theses courses are available in the list.
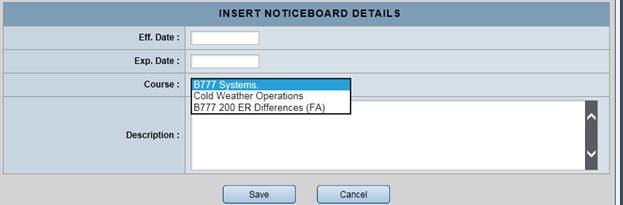
Note: these courses are the only courses available to this client for which the instructor is qualified.
If the user does not see the courses needed please check if the courses is shown in Client Management - Coursesand Instructor Qualification.
Fill in this short form:
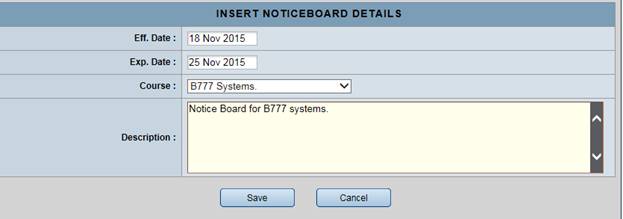
The user will be able to Save or Cancel the Notice Board by clicking on either of the two buttons available here:
![]()
Save will list the Notice Board on the table.

Courses
The Courses page is the third menu on the Navigation Bar.
Courses - Available Courses Tab
All the courses available in the LMS will be displayed here:
Pushing this icon takes the user to the course:
![]()
Whenever a course has been selected in this way, the course will be moved to the My Courses tab. If it is deleted from the My Courses tab, it will still show on the Available Courses tab.
Courses - My Courses Tab.

The user can take the course by clicking on this icon:
![]()
The user can remove courses by clicking on this icon:
![]()
Note: once the user removes a course, it will no longer be available on the list, but it will still be shown in Available Courses tab.
Dashboard
The Dashboard page can be found as a sub-menu on the Administration menu.
A qualified instructor can now see the Trainees who are taking the course.
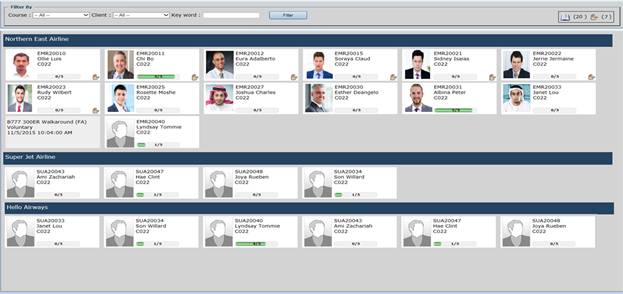
The number of Trainees who are taking a course and the number of Trainees who are raising their hands can be seen at the top right hand corner.
![]()
These are the Trainees who are taking a course with a specific client.

For each Trainee on this page the user will see their personal ID, full name, and the course code.

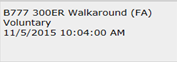
If the instructor moves the cursor over any Trainee, the user will see something like this:
The user will see the course name on top, followed by the course registration type and the date and time the course was taken.
The user will notice that the progress of each Trainee will be shown in their Trainee profile.
This Trainee has completed 0 out of 5 lessons in the course.
He also has a raised hand icon.

This Trainee has completed all the lessons in the course.
He did not raise his hand.

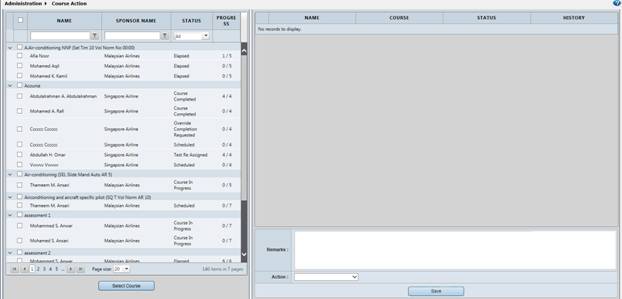
Course Action
The Course Action page can be found as a sub-menu on the Administration menu.
This page allows the user to view the status of all courses, tests and courses with tests for each Trainee.
Status
Let us explain the status available in the system for Course, Test and Course with Test.
Course
|
Status |
Description |
|
||
|
|
Scheduled |
Means the Trainee is enrolled for the Course. |
||
|
|
Course in Progress |
Means the Trainee is taking the Course. |
||
|
|
Content Completed |
Means the Trainee met the completion percentage required for the Course (see Completion Percentage). |
||
|
|
Course Completed |
Means the Course has been successfully completed…. but only once the Tick icon has been clicked. |
||
|
|
Elapsed |
Means the Course Valid Until date has passed |
||
Test
|
Status |
Description |
|
||
|
|
Scheduled |
Means the Trainee is enrolled for the Test. |
||
|
|
Test in Progress |
Means the Trainee is taking the Test. |
||
|
|
Test Completed |
Means the Trainee met the passing percentage required for the Test (See Test Catalog). |
||
|
|
Test not Passed |
Means the Trainee did not meet the passing percentage required for the Test (See Test Catalog). |
||
|
|
Elapsed |
Means the Test Valid Until date has passed |
||
Course with a Test
|
Status |
Description |
|
||
|
|
Scheduled |
Means the Trainee is enrolled for the Course |
||
|
|
Course in Progress |
Means the Trainee is taking the Course. |
||
|
|
Content Completed |
Means the Trainee met the completion percentage required for the Course (see Completion Percentage). |
||
|
|
Test in Progress |
Means the Trainee is taking the Test. |
||
|
|
Test Completed |
Means the Trainee met the passing percentage required for the Test (See Test Catalog). |
||
|
|
Test not Passed |
Means the Trainee did not meet the passing percentage required for the Test (See Test Catalog). |
||
|
|
Course Completed |
Means the Course and Test have been successful completed. |
||
|
|
Elapsed |
Means the Course and Test Valid Until date has passed (See Client Management-courses). |
||
Actions
Let us explain the actions available in the system.
|
Status |
Description |
|
||
|
|
Hold Course |
Means the Trainee cannot access the course. The course will be shown in Trainee page but the Take Course icon will be disabled. |
||
|
|
Hold Test |
Means the Trainee cannot access the Test. The course will be shown in Trainee page but the Take Course icon will be disabled. |
||
|
|
Hold Course/Test |
Means the Trainee cannot access the Course/Test. The course will be shown in Trainee page but the Take Course icon will be disabled. |
||
|
|
Cancel Hold |
Means the Trainee’s access is resumed, and the Take Course icon becomes enabled. |
||
|
|
Suspend |
Means the course will be temporarily removed from the Trainee’s page |
||
|
|
Cancel Suspend |
Means the course will be shown and Trainees can resume.
|
||
|
|
Reassign Test |
Means the test will again be assigned to the Trainee. |
||
|
|
Override Completion Requested |
Means passing the Trainee for the Course, Test or Course with Test. Override Completion Requested means approval is needed, which can be done in Completion Approval (See Completion Approval). |
||
To do an action, the user must select the Trainee name from the list, and then click on the Select Course button.
![]()
Every status has its own action, the table below shows the actions available for each status in Course, Test and Course with Test.
Course
|
1st Status |
1st Action |
2nd Status |
2nd Action |
3rd Status |
|
Scheduled |
Override Completion |
Override Completion Requested |
Cancel Override Completion Requested
|
Scheduled |
|
|
Hold Course |
Course on Hold |
Cancel Hold |
Scheduled |
|
|
Suspend |
Suspended |
Cancel Suspend |
Scheduled |
|
Course in Progress |
Override Completion |
Override Completion Requested |
Cancel Override Completion Requested |
Course in Progress |
|
|
Hold Course |
Course on Hold |
Cancel Hold |
Course in Progress |
|
|
Suspend |
Suspended |
Cancel Suspend |
Course in Progress |
|
Content Completed |
Override Completion |
Override Completion Requested |
Cancel Override Completion Requested |
Content Completed |
|
|
Hold Course |
Course on Hold |
Cancel Hold |
Content Completed |
|
|
Suspend |
Suspended |
Cancel Suspend |
Content Completed |
|
Course Completed |
No Action |
|
|
|
|
Elapsed |
No Action |
|
|
|
Test
|
1st Status |
1st Action |
2nd Status |
2nd Action |
3rd Status |
3rd Action |
4th Status |
|
Scheduled |
Override Completion |
Override Completion Requested |
Cancel Override Completion Requested |
Scheduled |
|
|
|
|
Hold Test |
Test on Hold |
Cancel Hold |
Scheduled |
|
|
|
|
Suspend |
Suspended |
Cancel Suspend |
Scheduled |
|
|
|
Test in Progress |
Override Completion |
Override Completion Requested |
Cancel Override Completion Requested |
Test in Progress |
|
|
|
|
Reassign Test |
Test Reassigned |
Override Completion |
Override Completion Requested |
Cancel Override Completion Requested |
Test Reassigned |
|
|
|
|
Hold Test |
Test on Hold |
Cancel Hold |
Test Reassigned |
|
|
|
|
Suspend |
Suspended |
Cancel Suspend |
Test Reassigned |
|
Test Completed |
No Action |
|
|
|
|
|
|
Test not Passed |
Override Completion |
Override Completion Requested |
Cancel Override Completion Requested |
Test in Progress |
|
|
|
|
Reassign Test |
Test Reassigned |
Override Completion |
Override Completion Requested |
Cancel Override Completion Requested |
Test Reassigned |
|
|
|
|
Hold Test |
Test on Hold |
Cancel Hold |
Test Reassigned |
|
|
|
|
Suspend |
Suspended |
Cancel Suspend |
Test Reassigned |
|
Elapsed |
No Action |
|
|
|
|
|
Course with Test
|
1st Status |
1st Action |
2nd Status |
2nd Action |
3rd Status |
3rd Action |
4th Status |
|
Scheduled |
Override Completion |
Override Completion Requested |
Cancel Override Completion Requested
|
Scheduled |
|
|
|
|
Hold Course |
Course on Hold |
Cancel Hold |
Scheduled |
|
|
|
|
Hold Test |
Test on Hold |
Cancel Hold |
Scheduled |
|
|
|
|
Hold Course/Test |
Course/Test on Hold |
Cancel Hold |
Scheduled |
|
|
|
|
Suspend |
Suspended |
Cancel Suspend |
Scheduled |
|
|
|
Course In Progress |
Override Completion |
Override Completion Requested |
Cancel Override Completion Requested |
Course In Progress |
|
|
|
|
Hold Course |
Course on Hold |
Cancel Hold |
Course in Progress |
|
|
|
|
Hold Test |
Test on Hold |
Cancel Hold |
Course in Progress |
|
|
|
|
Hold Course/Test |
Course/Test on Hold |
Cancel Hold |
Course in Progress |
|
|
|
|
Suspend |
Suspended |
Cancel Suspend |
Course in Progress |
|
|
|
Content Completed |
Override Completion |
Override Completion Requested |
Cancel Override Completion Requested |
Content Completed |
|
|
|
|
Hold Course |
Course on Hold |
Cancel Hold |
Content Completed |
|
|
|
|
Hold Test |
Test on Hold |
Cancel Hold |
Content Completed |
|
|
|
|
Hold Course/Test |
Course/Test on Hold |
Cancel Hold |
Content Completed |
|
|
|
|
Suspend |
Suspended |
Cancel Suspend |
Content Completed |
|
|
|
Test in Progress |
Override Completion |
Override Completion Requested |
Cancel Override Completion Requested |
Test In Progress |
|
|
|
|
Reassign Test |
Test Reassigned |
Override Completion |
Override Completion Requested |
Cancel Override Completion Requested |
Test Reassigned |
|
|
|
|
Hold Course |
Course on Hold |
Cancel Hold |
Test Reassigned |
|
|
|
|
Hold Test |
Test on Hold |
Cancel Hold |
Test Reassigned |
|
|
|
|
Hold Course/Test |
Course/Test on Hold |
Cancel Hold |
Test Reassigned |
|
|
|
|
Suspend |
Suspended |
Cancel Suspend |
Test Reassigned |
|
Test Not Passed |
Override Completion |
Override Completion Requested |
Cancel Override Completion Requested |
Test In Progress |
|
|
|
|
Reassign Test |
Test Reassigned |
Override Completion |
Override Completion Requested |
Cancel Override Completion Requested |
Test Reassigned |
|
|
|
|
Hold Course |
Course on Hold |
Cancel Hold |
Test Reassigned |
|
|
|
|
Hold Test |
Test on Hold |
Cancel Hold |
Test Reassigned |
|
|
|
|
Hold Course/Test |
Course/Test on Hold |
Cancel Hold |
Test Reassigned |
|
|
|
|
Suspend |
Suspended |
Cancel Suspend |
Test Reassigned |
|
Course Completed |
No Action |
|
|
|
|
|
|
Elapsed |
No Action |
|
|
|
|
|
Completion Approval
The Completion Approval page can be found as a sub-menu on the Administration menu.
This page allows the user to approve or reject the status Override Completion Requested.
For instance, if the instructor wants to allow someone to pass the course, approval should be given by the trainer.
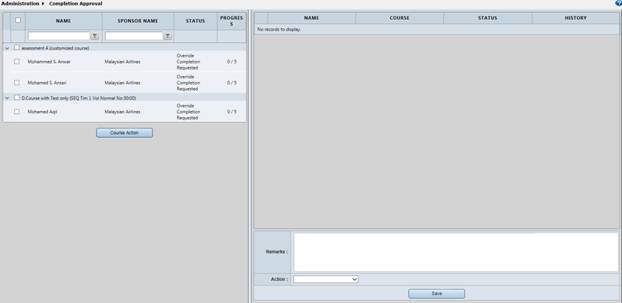
The list shows only the Course, Test andCourse with Test that is pending.
Once the user approves the override:
ü If the user approves the Override Completion Requested for a Course, the status will change to Course Completed.
ü If the user approves the Override Completion Requested for a Test, the status will change to Test Completed.
ü If the user approves the Override Completion Requested for a Course/Test, the status will change to Test Completed.
Once the user rejects the override request:
Course
|
1st Status |
1st Action |
2nd Status |
Completion Approval |
Status in Course Action |
|
|
Scheduled |
Override Completion |
Override Completion Requested |
Reject |
Scheduled |
|
|
Course in Progress |
Override Completion |
Override Completion Requested |
Reject |
Course in Progress |
|
|
Content Completed |
Override Completion |
Override Completion Requested |
Reject |
Content Completed |
|
Test
|
1st Status |
1st Action |
2nd Status |
2nd Action |
3rd Status |
Completion Approval |
Status in Course Action |
|
Scheduled |
Override Completion |
Override Completion Requested |
|
|
Reject |
Scheduled |
|
Test in Progress |
Override Completion |
Override Completion Requested |
|
|
Reject |
Test in Progress |
|
|
Reassign Test |
Test Reassigned |
Override Completion |
Override Completion Requested |
Reject |
Test in Progress |
|
Test not Passed |
Override Completion |
Override Completion Requested |
|
|
Reject |
Test not Passed |
|
|
Reassign Test |
Test Reassigned |
Override Completion |
Override Completion Requested |
Reject |
Test Reassigned |
Course with Test
|
1st Status |
1st Action |
2nd Status |
2nd Action |
3rd Status |
Completion Approval |
Status in Course Action |
|
|
Scheduled |
Override Completion |
Override Completion Requested |
|
|
Reject |
Scheduled |
|
|
Course in Progress |
Override Completion |
Override Completion Requested |
|
|
Reject |
Course in Progress |
|
|
|
|
|
|
|
Reject |
Course in Progress |
|
|
Content Completed |
Override Completion |
Override Completion Requested |
|
|
Reject |
Content Completed |
|
|
Test in Progress |
Override Completion |
Override Completion Requested |
|
|
Reject |
Test in Progress |
|
|
|
Reassign Test |
Test Reassigned |
Override Completion |
Override Completion Requested |
Reject |
Test in Progress |
|
|
Test not Passed |
Override Completion |
Override Completion Requested |
|
|
Reject |
Test not Passed |
|
|
|
Reassign Test |
Test Reassigned |
Override Completion |
Override Completion Requested |
Reject |
Test in Progress |
|
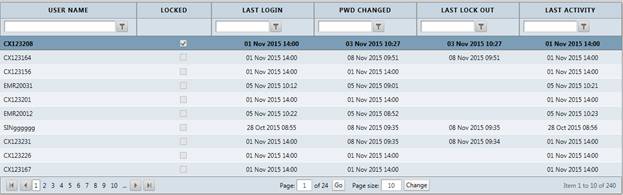
Manage Users
The Manage Users page can be found as a sub-menu on the User Management menu.
The user can control the user account in the system whether they are Trainees, Instructor or Client Admin.
This page is suitable for administrator use only.
The table shows all the users of the LMS.
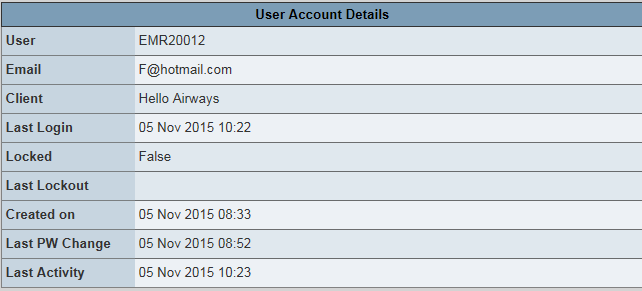
Selecting a user will display their security details:
1. User ID
2. Email Address
3. Client Name
4. The last time the user logged into the system
5. The last time the user was locked by security
6. When the user account was created
7. The last time their password was changed
8. The last time the user used the system
This button will allow the administrator to reset the password of a selected user:
![]()
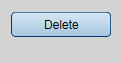
This button will allow the administrator to delete the account of a selected user:
If the account is locked by security, this button will be shown:
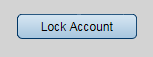
This button will allow the administrator to lock the account of a selected user:
If the account is locked by security, this button will be shown:
This button will allow the administrator to unlock the account of a selected user:
![]()
The Activate Account button will allow the users to see users who have an account, but whose passwords have not yet been created.
![]()
Supervisor Configuration
The Supervisor Configuration page can be found as a sub-menu on the Configuration menu.
Supervisor Configuration - Pass Code Tab
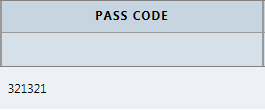
This page allows the user to set up a pass code. This is the password that Trainees need to obtain in order to take a test, if a password is required.
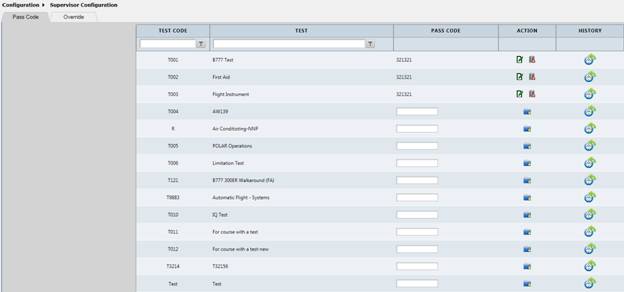
This list is a list of all the tests available in the LMS:

· Test Code
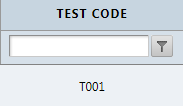
· Test Title

· Pass Code (Test Password)
· Action
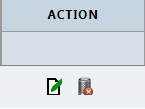
Clicking on ![]() will allow the user to edit the pass code.
will allow the user to edit the pass code.
Clicking on ![]() will allow the user to delete the pass
code.
will allow the user to delete the pass
code.
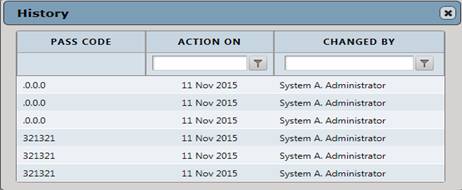
· History
Used to view the actions previously taken a place in this test
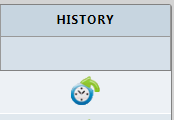
Clicking on this icon
![]() will show a
window with a full history of the test:
will show a
window with a full history of the test:
· The latest pass code that has been sat up since the test was initialized.
· The date the pass code was created.
· The user who changed the pass code.
Supervisor Configuration - Override Tab
This page allows the user to exclude Trainees who have a test with a pass code from entering a password.
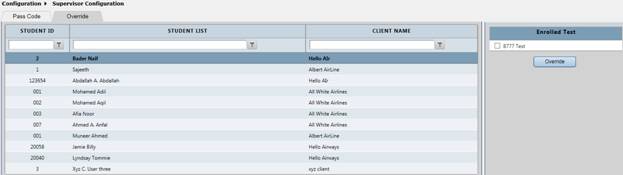
This Trainee has only one test that has supervision required:
Any Trainee listed here is enrolled in a test. Course Enrollment
Any Trainee listed here has a test with supervision required check the Client Management-Courses
If the check box of the test is checked, it means the selected Trainee does not have to enter a pass code for this test.
If the checkbox of the test is not checked, it means the selected Trainee has to enter a pass code to take the test.
System Configuration
The System Configuraion page can be found as a sub-menu on the Configuration menu.
This page allows the user to edit data in the list boxes.

Focus Group
Any modification to the list will be reflected in:
· Focus Group field in User Registration-General tab

Gender
Any modification to the list will be reflected in:
· Client Management - Account - General
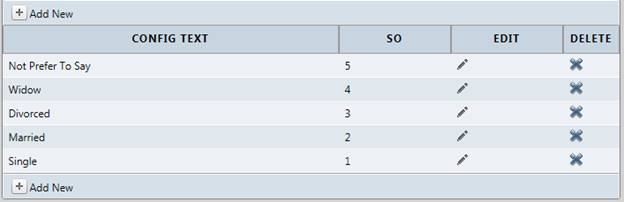
Marital Status
Any modification to the list will be reflected in:
Nationality
Any modification to the list will be reflected on:
· Nationality Field Client Management - Account - General
· Country Field Client Management - Account – Home Addr
· Country Field Client Management - Account – Office Addr
· Nationality Field User Registration - Account - General
· Country Field User Registration - Account – Home Addr
· Country Field User Registration - Account – Office Addr

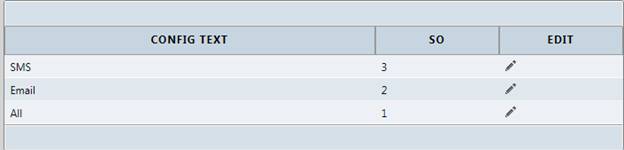
Notify By
Any modification to the list will be reflected in:
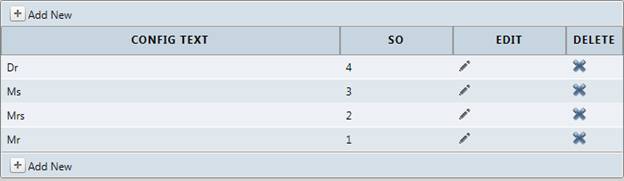
Title
Any modification to the list will be reflected in:
· Client Management- Account- General
User Type
Any modification to the list will be reflected in:
· User Type Field in User Registration- General

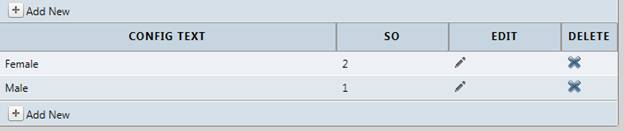
Now, Gender is selected from Group Name.

Click on the Edit icon
![]() for the Female will display this
window.
for the Female will display this
window.
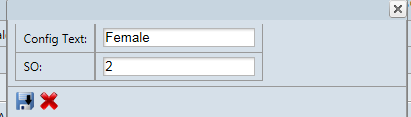
This will allow the user to rename the Config Text.
SO means the position of the item on the list.

![]() This icon will save the
modification made.
This icon will save the
modification made.
![]() This icon will cancel the
modification.
This icon will cancel the
modification.
![]() This icon allows the user to remove
Female from the gender list.
This icon allows the user to remove
Female from the gender list.
This label allows the
user to add a gender, if
necessary. ![]()
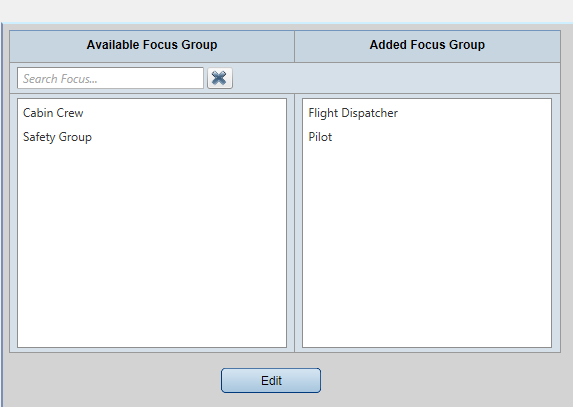
Focus Configuration
The Focus Configuration page can be found as a sub-menu of the Configuration menu.
This page allows the user to assign a course to a focus group.
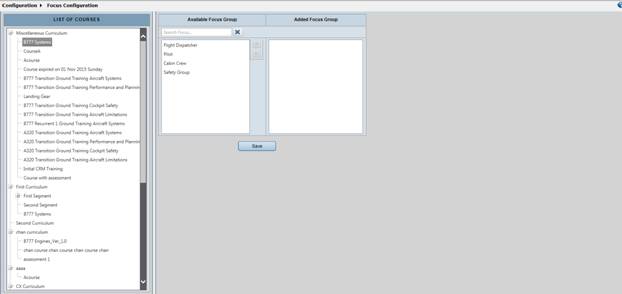
This list of courses are retrieved from the Training Program
The Focus group in Available Focus Group is retrieved from the System Configuration- Focus Group
The main concept behind this page is to manage the courses that will be displayed on the Trainee page (see Course Page - Available Courses tab).Specifically, the courses that will be displayed in the courses tab should be:
ü Voluntary Courses (see Course Catalog and Client Management-Courses tab).
ü The Course Focus Group should match the Trainee Focus Group (see User Registration).
The user may notice that the list shows the courses available in the LMS.
These two boxes show all the focus groups available in the system. They are created by the user (see System Configuration- Focus group).
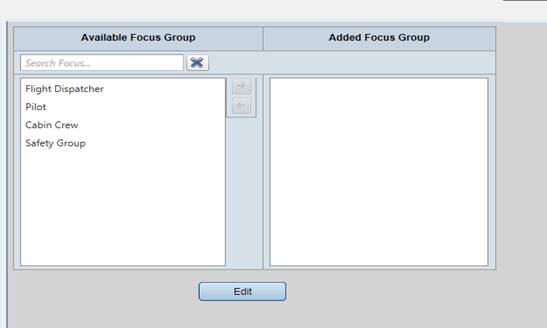
Clicking on the Edit buttonwill allow the user to assign one or more focus groups to the course.
The user will notice that the user can add and remove a focus group for this course using these icons:
![]()
Move the focus group that the user wants to add to the selected course and add it to the focus group box.
Notification Configuration
The Notification Configuration page can be found as a sub-menu on the Configuration menu.
Mail Setup
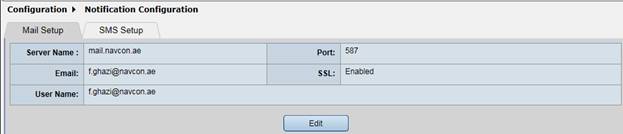
Server name is the server name.
Port is the server port.
Email is the email address from which the user wants the notification to be sent.
SSL is a secure sockets layer, and is used for security purposes.
Username is the system username.
Password is the system password (the password will be shown after clicking on the Edit button).
The user can edit the information it contains by clicking on the Edit button.
![]()
Once the user clicks on the Edit button, they will see three buttons:
An Update button to update new textboxes
A Cancel button to cancel newly-entered data
A Test Mail button to verify that the email has been sent successfully
![]()
Reports
Take a look at this table to learn more about each report:
|
# |
Report Name |
Description |
|
1 |
User List |
To show the names and details of the users in the system. |
|
2 |
Sponsor List |
To show the sponsor’s name, license dates and status. |
|
3 |
Course Catalog |
To show all the courses with their details Course Registration, Reading Method, Course Type, Completion Precetnge |
|
4 |
Test Catalog |
To show the test names and details. This is retrieved from the Test Catalog page. |
|
5 |
Trainee Completion |
To show the completed Courses, Tests and Courses with Tests groups by Trainee name and sponsor name. |
|
6 |
Trainees in Progress |
To show the completed Courses, Tests and Courses with Tests groups by Trainee name and sponsor name. |
|
7 |
Reassigned Test Summary |
To show the number of Trainees in each Course, Test and Course with Test that have Reassigned Test status. |
|
8 |
Test Average Score Based on Course |
To show the average score of the Course, Test and Course with Test for each sponsor. |
|
9 |
Number of Trainees Enrolled for a Course/Test |
To show the number of Trainees enrolled in each Course, Test and Course with Test. |
|
10 |
Override Requested Summary |
To show the the total number of Trainees whose status was changed to Override Completion, along with the first name of the user who changed the status. |
|
11 |
Course Comepleted Statistics |
To show the total number of Trainees who completed the Course, Test and Course withTest. |
|
12 |
Trainee Course Reading Status |
To show the status of each Course, Test and Course with Test group by Trainee name, as enrolled by each sponsor. |
|
13 |
Module Trend Analysis |
To show the average score for each test, based on questions retrieved from the Module level. This report will help the sponosr to anlayze the average performance of the tests, in order to improve the tests, if necessary. |
|
14 |
Override Approved Summary |
To show the total number of Trainees that were changed from Override Completion Requested and have been approved by the instructor (Course Action Page + Completion Approval Page). This report shows the name of the user who approved the requested override completion. |
|
15 |
Override Competion (Requested/Approved) |
To show user who changed the status of Courses, Tests and Courses with Tests from Override Completion Requested to Approved, Rejected or Cancel Override Completion. |
|
16 |
Module Trend Analysis (Indivisual Test) |
To show the score of each test in groups by Module. |
|
17 |
Trainee Certificate |
To show the trainees who have successfully completed the course, test and course with test so as to print a certificate for them. |
|
18 |
Organisation Workload Details |
To show the course workload for each client. |
|
19 |
Training Program with Syllabous Hours |
To show the syllabous hours for each course. |
Trainee’s Page
Master Page
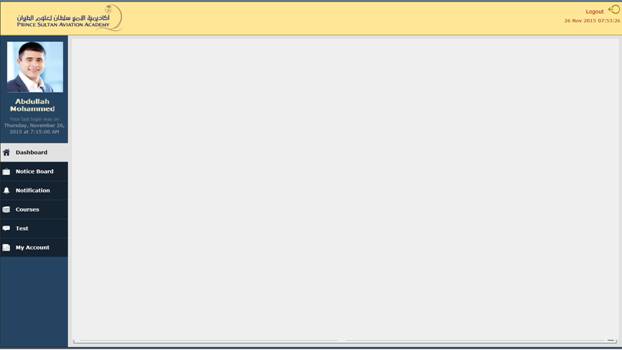
Logout:
Allows the Trainees to log out and directs the Trainee to the login page.
Date and Time:
Shows the current date and time, based on the server data and time.
Picture:
This Picture box will show the Trainee’s picture.

User Full Name:
Shows the user’s full name.
Last Login:
Shows the last time the Trainee used the system.
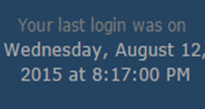
Navigation Bar:
The Navigation bar allows the Trainee to move from one page to another.
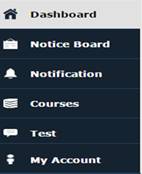
Dashboard

Enrolled Course Icon:
This shows the number of courses for which the Trainee is enrolled (See My Courses Tab).

Progress Icon
This shows the number of courses the Trainee has already started (See My Courses Tab).
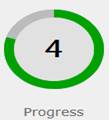
Assigned Test Icon:
The number of tests assigned to a Trainee. (See My Tests Tab )
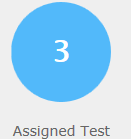
Courses Icon:
This icon will direct the user to the Courses page.
Resume Icon:
If a Trainee takes a course then exits the course, this will show in order to allow the Trainee resume the course at any time. The course will start from the last slide the Trainee viewed before exiting the course.
Course Noticeboard
This box has a Noticeboard that has been created by the instructor (See Noticeboard):
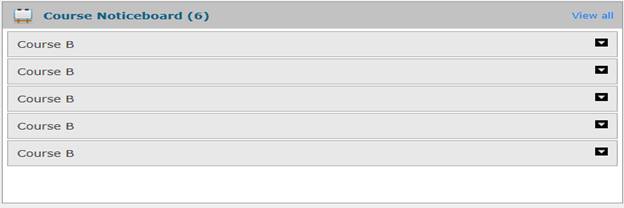
This number shows the number of new notices that have not yet been read by the Trainee. A maximum of five new notices can be seen on the noticeboard.
![]()
Clicking on the down arrow icon will show any extra hidden notices.

Course B is the course name.
Noticeboard is the content that the instructor posted on the Noticeboard (See Noticeboard).
Clicking on the View All label will direct the Trainee to the Noticeboard page.
![]()
Notification
This box shows the courses and tests that have been recently added:
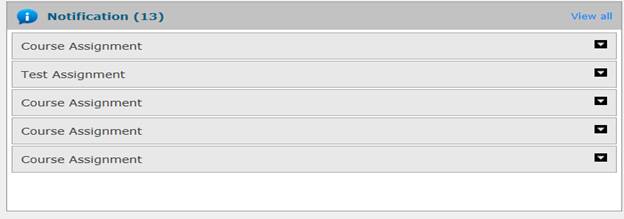
This number shows the number of new notifications that have not been read by the Trainee. A maximum 5 new notifications can be seen in this box:
![]()
Clicking on the down arrow icon will show any extra hidden information.

Clicking on the View All label will direct the Trainee to the Notification page.
![]()
Test
This box shows a small report of the tests assigned to the Trainee, with the score obtained for each test:
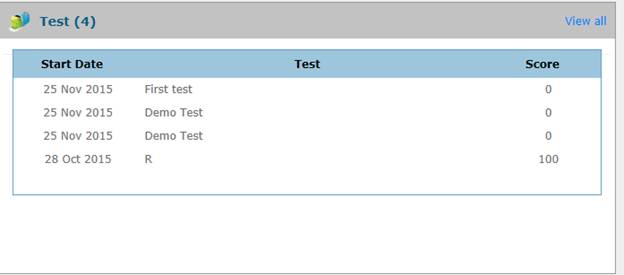
This indicates the number of tests the Trainees has attended:
![]()
Clicking on the View All label will direct the Trainee to the Test page.
Course Status
This box shows the courses for which the Trainee is now enrolled:
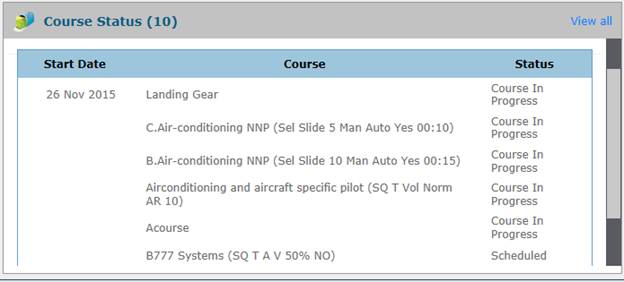
Clicking on the View All label will direct the Trainee to the Courses page.
Noticeboard
This page shows all the notices for courses in which the Trainee is enrolled:
Notification
This page shows all the notifications for courses in which the Trainee is enrolled:
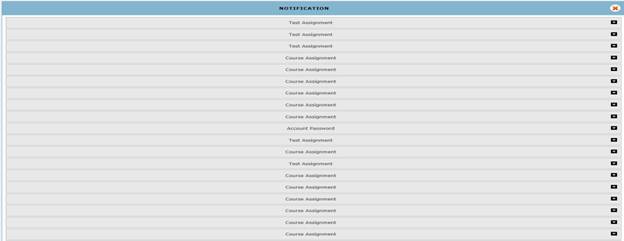
Courses
My Courses
This page shows the courses in which the Trainee is enrolled:
Note: all the courses and courses with tests that have been assigned to the Trainee will be shown here, regardless of whether they are voluntary or mandatory.
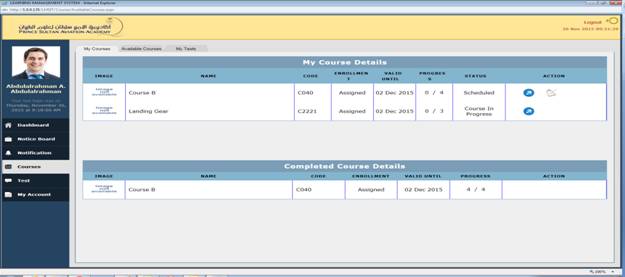
1.
This is a course with
test because there are two icons: ![]() and
and ![]()
![]()
Note: the user will notice that the test icon is disabled because a completion percentage for the course is required to attend the test (See completion percentage of the course on the Client Managementpage).
If the completion
percentage has been met for the course, the test icon will be
enabled, and will look like this:![]()
2.
This is a course
only because the course only has a take course icon: ![]()
![]()
Take Course Icon
Clicking on this icon will redirect the user to the course:
![]()
Course Outline
The user will see a page like this:

This is the course level, with the course name at the top:
![]()
This is the module level:
![]()
This is the lesson level that has no sub lesson:

This is the lesson level that has a sub lesson:
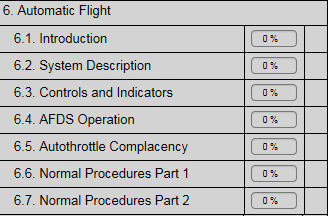
If the Trainee finishes all the slides of the current lesson, the lesson will show 10% completed. If the completion percentage is 10%, the user will see something like this:
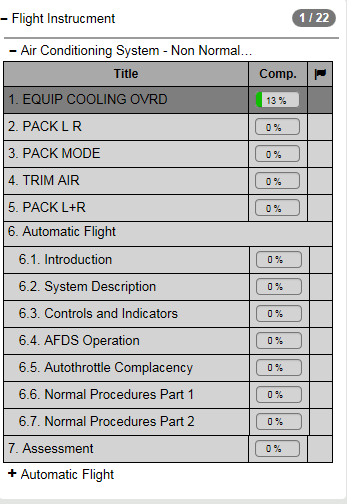
There are four lessons in this course. Since the course has a completion percentage of ”10 %”, the Trainee will see the percentage fulfilled in the current lesson and the course ration has been changed to “1/22”.
![]()
![]()
This is the assessment where the user can see questions that were created in Question feature for Module Level.
![]()
Clicking on this icon will display or hide the course content:
![]()
The user will see something like this:
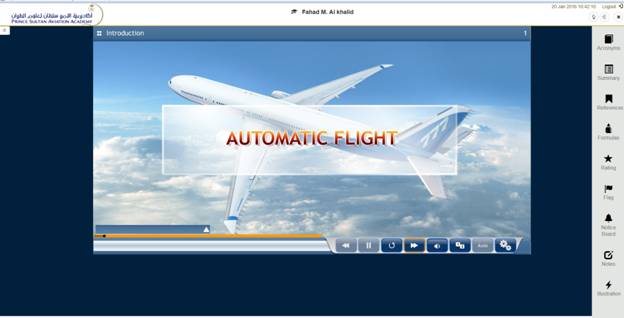
Course Control
Let us start the course by clicking on the Lesson level.
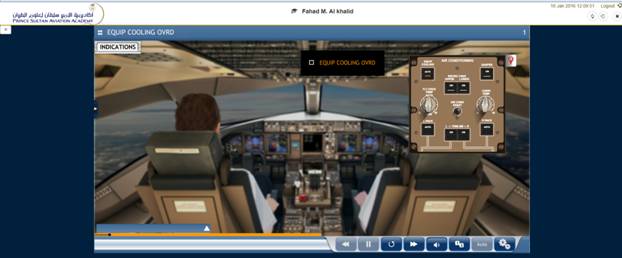
The user will notice some icons at the bottom of the slide.
![]()
![]() This icon will play the previous
slide.
This icon will play the previous
slide.
![]() This icon will stop the
slide.
This icon will stop the
slide.
![]() This icon will replay the current
slide.
This icon will replay the current
slide.
![]() This icon will skip the current
slide. This icon will be disabled if the course is set to
sequence (See the client
management-courses).
This icon will skip the current
slide. This icon will be disabled if the course is set to
sequence (See the client
management-courses).
![]() This icon will mute the voiceover
for the slide.
This icon will mute the voiceover
for the slide.
![]() This is a page selector, where the
Trainee can move from one slide to another. This icon will be
disabled if the course is set to sequence (See the client
management-courses).
This is a page selector, where the
Trainee can move from one slide to another. This icon will be
disabled if the course is set to sequence (See the client
management-courses).
Clicking on this icon will show a selection option:
This lesson has four slides, so the Trainee can move from slide to another.
![]() This icon will allow the user to
control the movement of the slide.
This icon will allow the user to
control the movement of the slide.
1. Auto means the slide will continue on until the end of the current lesson.
2. Normal means the lesson will stop at the end of every slide, and the Trainee has to click on the Next icon every time a slide ends.
This icon will be disabled if the course is set to Normal (See course catalog).
![]() This icon will allow the user to
edit the layout of the page.
This icon will allow the user to
edit the layout of the page.
Raise Hand
The raise hand icon will show on the instructor dashboard that a Trainee has raised their hand.
Course Exit
The “X” icon will close the course and direct the Trainee to the Courses page.
![]()
Course Features
This icon will show the features we created for the course and module levels.
![]()
This will be displayed:

Note: if the features Acronyms, Summary, References, Formulas, and Illustration are not available at Module level, the features that are in Course level will be shown.
Also Note: if the features that the user is looking for are not showing here, please check the Client Management-Features tab.
Acronyms
Click on this icon:

The user will see all the acronyms that have been added.
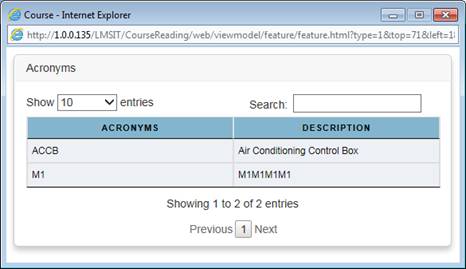
Summary
Click on this icon:

The user will see this:
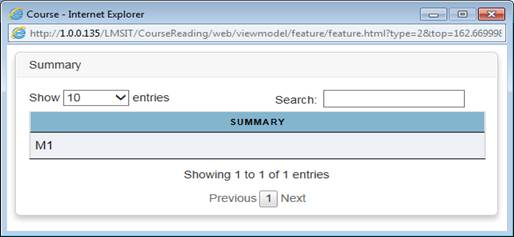
References
Click on this icon:

The user will see this:
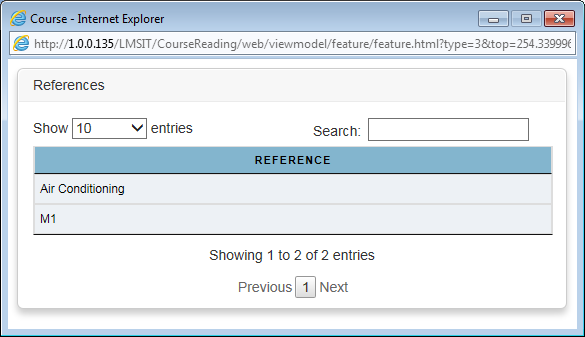
Formulas
Click on this icon:

The user will see this:
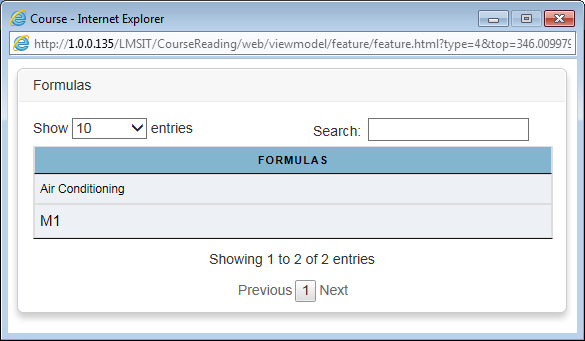
Rating
Click on this icon:

The user will see this:
The rating for the current lesson.
Flag
Click on this icon:

The user will see this:
The Trainee can make a
selection from the list available and then click on this icon
![]() to save the selection. This feature is available
for later reference; if the Trainee wants to go over a lesson that
they have flagged, and then they can filter it from the filter
available.
to save the selection. This feature is available
for later reference; if the Trainee wants to go over a lesson that
they have flagged, and then they can filter it from the filter
available.
Notice Board
Click on this icon:

The user will see this:
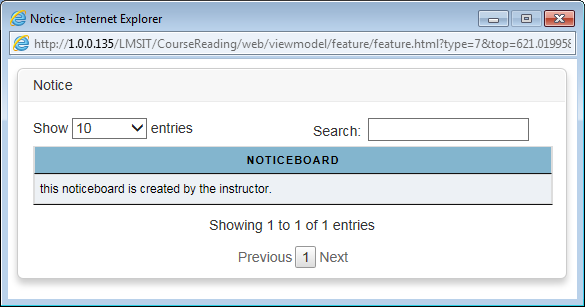
Notes
Click on this icon:

The user will see this:
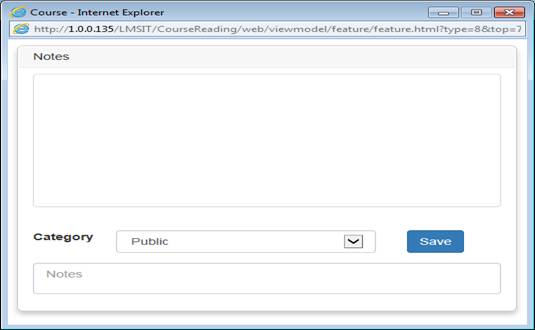
There are two notes:
ü Public allows the Trainee to create a public note to share it with other Trainees who are enrolled in the same course, subject to approval.
ü Private allows the Trainee to create a private note for their use only.
Illustration
Click on this icon:

The user will see this:

Tick Icon
Seeing this icon ![]() means the course has been completed, which means the
Trainee has attained the completion percentage for the
course.
means the course has been completed, which means the
Trainee has attained the completion percentage for the
course.
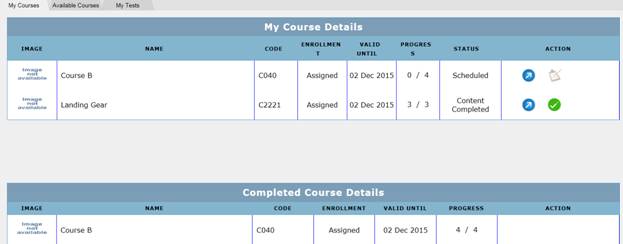
When the Trainee clicks on the tick icon, the icon will be removed from the list and will be displayed in the Completed Course Details section.
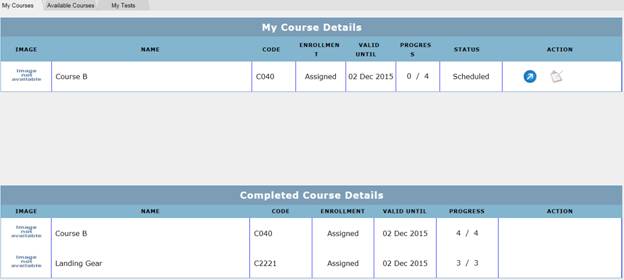
Test Icon
Available Courses

Note: all the courses and courses with tests that have been assigned to the Trainee will not be shown here. They will only be shown in the courses and courses with tests that are voluntary and in the same group as the user and the Trainee focus group. The courses and courses with tests should be assigned to the client on the Client Management page, and should not be assigned to the Trainee.
My Tests

Test
This page allows the Trainee to see all the tests they attended, with the score obtained for the test.

My Account
This page is for password recovery.
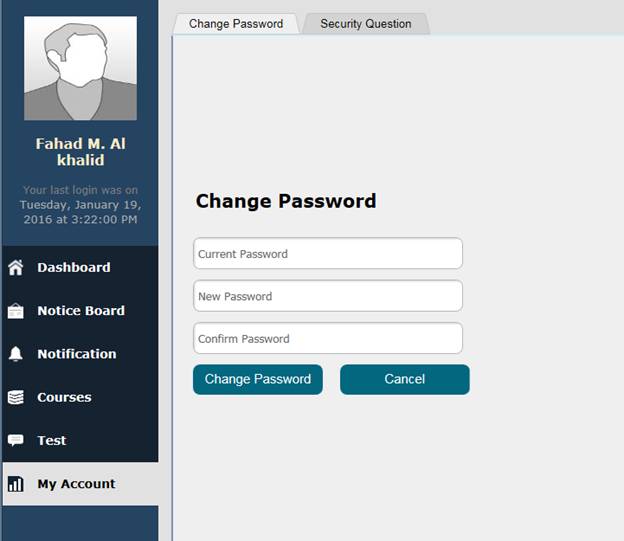
Change Password
This page allows the trainees to reset their password at any time.
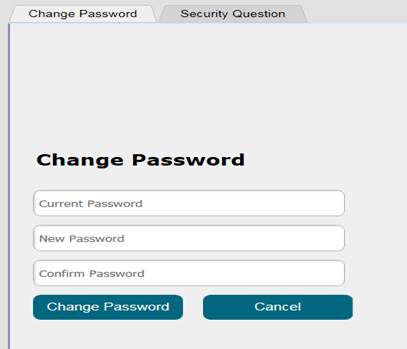
Security Questions
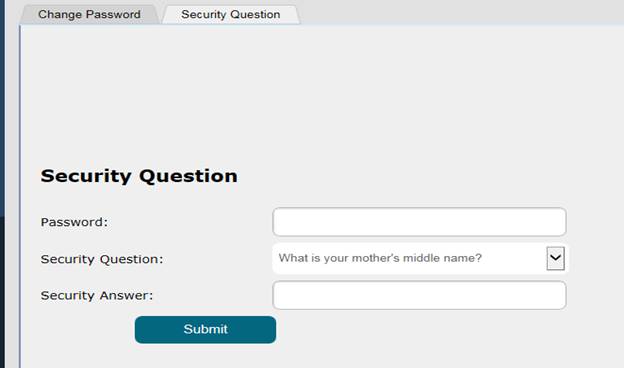
In order to set a security question, the trainee needs to do the following:
· Enter the password in the password textbox.
![]()
· Select a security question from the list available.
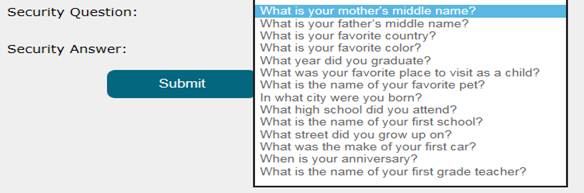
· Set a security answer for the question.

Once the setup is finished, the trainee must save the changes by clicking on the Submit button.
![]()
After clicking on the Submit button, the trainee will see a message like this:

Textboxes left empty will show that the field is required.
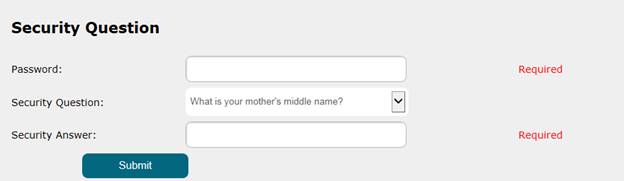
An invalid password will show this message:
